Dont Guess Which Battery Terminal To Remove First Safely

Featured image for which battery terminal to remove first
Image source: pngimg.com
Always remove the negative battery terminal first to ensure your safety and prevent dangerous electrical shorts. This critical step disconnects the ground, eliminating the risk of accidental sparks or damage when working on your vehicle’s electrical system. Prioritizing this order makes battery maintenance significantly safer and protects against injury.
Don’t Guess Which Battery Terminal To Remove First Safely
Hey there! Have you ever found yourself staring at your car battery, wrenches in hand, wondering, “Which battery terminal to remove first?” It’s a common moment of hesitation for many DIYers, and trust me, you’re not alone. We’ve all been there, second-guessing ourselves before diving into something that seems simple but carries significant risks if done incorrectly. It’s not just about getting the job done; it’s about doing it safely, protecting yourself and your vehicle.
Disconnecting a car battery might seem like a straightforward task, whether you’re replacing it, cleaning corrosion, or working on your car’s electrical system. But there’s a specific order of operations that’s absolutely crucial. Guessing or doing it the wrong way can lead to dangerous sparks, damage to your car’s sensitive electronics, or even personal injury. Nobody wants a shock, a melted tool, or an expensive repair bill just because they didn’t know which battery terminal to remove first.
Today, we’re going to clear up all that confusion. Think of this as your friendly guide to confidently and safely disconnecting your car battery. We’ll walk through the “why” behind the specific order, what tools you’ll need, and a simple step-by-step process. By the end of this, you’ll not only know which battery terminal to remove first but you’ll also understand the reasoning, empowering you to tackle battery maintenance with absolute confidence.
Key Takeaways
- Always remove the negative terminal first to prevent short circuits.
- Always connect the negative terminal last during reinstallation.
- Removing negative first eliminates the ground path, preventing sparks.
- Guessing risks dangerous sparks, shorts, or battery explosions.
- Use insulated tools to avoid accidental contact and shorts.
- Wear safety glasses and gloves for protection against hazards.
- Confirm battery polarity before starting any work.
📑 Table of Contents
Why Does it Even Matter? Understanding the Risks
You might be thinking, “It’s just two cables, what’s the big deal?” But when it comes to a car battery, there’s a lot of power packed into those terminals. Understanding the potential dangers is the first step toward appreciating why knowing which battery terminal to remove first is so important.
The Dangers of a Short Circuit
Your car battery is a powerful energy source. If you accidentally create a direct path between the positive and negative terminals, you’ll cause a short circuit. This can result in a sudden, massive surge of electrical current. Imagine a huge spark, heat, and potentially even an explosion. A short circuit isn’t just a minor mishap; it can cause severe burns, ignite flammable materials near the battery, or even cause the battery to vent dangerous gases or rupture. This is the primary reason why knowing which battery terminal to remove first is critical for safety.
Protecting Your Vehicle’s Electronics
Modern cars are packed with sophisticated electronic systems – engine control units (ECUs), infotainment systems, airbags, and more. These components are sensitive to power fluctuations. Disconnecting your battery in the wrong order can create voltage spikes or drops that can “confuse” or even permanently damage these delicate electronics. A simple mistake here could lead to costly diagnostic fees and repairs, far outweighing the time saved by rushing.
Personal Safety is Paramount
Beyond the car itself, your personal safety is the top priority. Sparks can cause burns, battery acid can irritate skin and eyes, and a sudden jolt can make you jump, leading to other accidents. Always wear appropriate safety gear, and always follow the correct procedure for disconnecting battery terminals to keep yourself out of harm’s way.
The Golden Rule: Negative First, Positive Last
Okay, let’s get straight to the answer: when disconnecting your car battery, you should always remove the negative terminal first. And when reconnecting, you do the opposite: positive first, then negative. This is the golden rule, and understanding why it’s the correct way to know which battery terminal to remove first will make it easier to remember.
Why Negative (Black) First?
Most cars operate on a “negative ground” system. This means the negative terminal of your battery is connected directly to the metal chassis (body) of your vehicle. The entire car body acts as part of the electrical circuit for the negative current flow. If you start by removing the positive terminal, and your wrench accidentally touches any metal part of the car’s body while it’s still connected to the positive terminal, you immediately create a direct short circuit. This is because the car’s chassis is acting as the negative path back to the battery.
By removing the negative terminal first, you effectively break this ground connection. Once the negative cable is disconnected, even if your wrench accidentally touches the positive terminal and a metal part of the car, it won’t cause a short circuit because the negative path back to the battery has been interrupted. This is the core safety principle behind which battery terminal to remove first.
The Role of the Vehicle’s Chassis
Think of your car’s metal frame and body as a giant negative wire. It’s always connected to the negative terminal of your battery. If the positive terminal is still connected, and you accidentally bridge it to the chassis with a metal tool, you’re essentially completing a massive circuit directly through your wrench, creating a dangerous spark and potential damage. This scenario is completely avoided when you disconnect the negative cable first, making the chassis “dead” in terms of its connection to the battery’s negative pole.
A Simple Analogy
Imagine a garden hose with water flowing. If you want to stop the water, you’d turn off the faucet (the negative connection to the ground). Once the faucet is off, you can safely handle the hose without worrying about getting soaked. If you tried to block the end of the hose while the faucet was still on, you’d just create a messy spray and potential pressure issues. That’s why understanding which battery terminal to remove first, by starting with the negative, is like turning off the faucet.
Tools and Preparations Before You Begin
Before you even think about which battery terminal to remove first, gather your tools and get prepared. A little preparation goes a long way in ensuring safety and efficiency.
Essential Safety Gear
- Safety Glasses: Crucial for protecting your eyes from sparks, battery acid, or debris.
- Gloves: Protect your hands from acid, grime, and potential electrical burns.
- Old Clothes: Battery acid can splash and damage clothing.
Gathering Your Tools
- Wrench or Socket Set: You’ll typically need a 10mm or 13mm wrench/socket for most battery terminals. Ensure it’s non-ratcheting or at least handled carefully to avoid accidental contact.
- Battery Terminal Cleaner (optional but recommended): A wire brush or specialized tool to clean corrosion.
- Battery Terminal Spreader (optional): Helps to gently pry open terminals if they are stuck.
- Battery Carrier Strap (optional): Makes lifting the heavy battery safer if you’re removing it.
Initial Checks and Precautions
Before you even begin to consider which battery terminal to remove first, make sure your car is turned off and the key is out of the ignition. Ensure all accessories (lights, radio, climate control) are off. Parking the car on a level surface with the parking brake engaged is also good practice. If you’re wearing any metal jewelry like rings or bracelets, it’s a good idea to remove them to prevent accidental short circuits.
A Step-by-Step Guide to Disconnecting Your Battery
Now that you know the theory, let’s put it into practice. Follow these steps carefully to ensure a safe disconnection, always keeping in mind which battery terminal to remove first.
Identifying Terminals and Cables
First, locate your battery terminals. The positive terminal is usually marked with a “P” or “+” sign and typically has a red cable connected to it. The negative terminal is marked with an “N” or “-” sign and has a black cable. Some batteries might also have plastic caps covering the terminals; remove these carefully.
Disconnecting the Negative Terminal
This is where knowing which battery terminal to remove first comes into play.
- Grab your wrench.
- Locate the nut or bolt on the clamp of the negative (-) terminal.
- Loosen the nut/bolt counter-clockwise until the clamp is loose enough to wiggle. You don’t need to remove the nut entirely.
- Carefully lift the negative cable off the terminal. If it’s stuck, gently twist it to loosen it.
- Once removed, ensure the cable is positioned so it cannot accidentally fall back onto the negative terminal or touch any metal part of the car. You can secure it with a bungee cord, zip tie, or simply tuck it away safely, perhaps wrapping it in a shop rag.
Disconnecting the Positive Terminal
Only after the negative terminal is safely disconnected, proceed to the positive.
- Now, move to the positive (+) terminal.
- Loosen the nut or bolt on its clamp counter-clockwise.
- Carefully lift the positive cable off the terminal.
- Again, ensure it’s positioned away from any metal parts of the car.
What to Do with the Cables After Disconnection
Once both cables are off, inspect them for corrosion. If present, use your battery terminal cleaner to scrub away the white or green buildup. This is also a good time to clean the battery terminals themselves before reassembly or replacement. If you’re removing the battery, make sure the battery hold-down clamp is also loosened or removed.
Reconnecting Your Battery: The Reverse Order
Just as there’s a specific order for which battery terminal to remove first, there’s also a correct order for reconnecting them. It’s essentially the reverse of disconnection.
Why Positive First for Reconnection?
When reconnecting, you connect the positive terminal first. Why? Because the negative terminal (the ground) is still disconnected. If you were to connect the negative first, and then accidentally touched your wrench to the positive terminal and any metal part of the car while trying to connect the positive cable, you’d again risk a short circuit. By connecting the positive terminal first, even if your wrench touches the car’s chassis, there’s no complete circuit to the negative pole of the battery, thus no spark.
The Reconnection Steps
- Place the battery back in its tray (if removed) and secure it with the hold-down clamp.
- Clean the battery terminals and cable clamps thoroughly if you haven’t already.
- Connect the positive (+) cable first. Place the red cable clamp onto the positive terminal and tighten the nut/bolt clockwise until it’s snug and secure. Don’t overtighten, as this can strip the threads or damage the battery post.
- Connect the negative (-) cable second. Place the black cable clamp onto the negative terminal and tighten the nut/bolt clockwise until it’s snug.
- Give both cables a gentle tug to ensure they are firmly attached and won’t wiggle loose. Loose connections can lead to starting problems or intermittent electrical issues.
Final Checks and Tips
After reconnecting, replace any plastic caps on the terminals. Double-check that all tools are clear of the engine bay. You might need to reset your car’s clock, radio presets, or power windows, as disconnecting the battery often erases these memory settings. Some modern cars may also require a brief “relearn” procedure for the engine computer; consult your owner’s manual if you notice any unusual behavior.
Common Mistakes to Avoid and Advanced Tips
Even with the right knowledge about which battery terminal to remove first, it’s easy to make small errors. Here are some common pitfalls and extra tips to keep in mind.
Don’t Rush It
Working on your car’s electrical system requires patience. Rushing can lead to mistakes, dropped tools, and accidental contacts that you want to avoid. Take your time, focus on each step, and double-check your work. Especially when it comes to knowing which battery terminal to remove first, pausing to confirm is always a good idea.
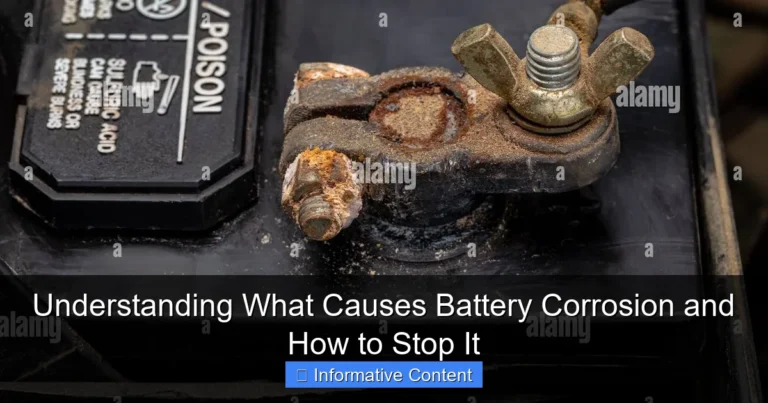
Watch Out for Corrosion
Battery corrosion (a fuzzy blue, white, or green substance) is a common sight. It’s acidic and can be a poor conductor of electricity, leading to starting problems. While cleaning, remember to wear your gloves and safety glasses. A mixture of baking soda and water can neutralize the acid, and a wire brush can scrub it away. Clean terminals ensure good electrical contact.
When to Seek Professional Help
While disconnecting a battery is a common DIY task, if you’re uncomfortable, unsure, or if your battery is in a particularly difficult-to-reach spot (like under the back seat or in the trunk of some luxury cars), it’s perfectly okay to seek professional help. Mechanics have specialized tools and experience to handle these situations safely. Your safety and peace of mind are always worth it.
For more advanced vehicles with complex electrical systems, disconnecting the battery can sometimes trigger fault codes or require specific recalibration procedures. If your owner’s manual warns against DIY battery disconnection or replacement, or if you’re dealing with a hybrid or electric vehicle, it’s definitely best to consult a qualified technician.
Conclusion
So, there you have it! The definitive answer to “which battery terminal to remove first” is the negative (-) terminal. And when reconnecting, always start with the positive (+) terminal. This simple rule is your key to safely performing battery maintenance, protecting both yourself and your vehicle’s intricate electronics. You now understand the critical reasons behind this order, moving beyond just memorizing a rule to truly understanding its importance.
Armed with this knowledge, you can approach your car battery with confidence, knowing you’re following best practices for safety and efficiency. Remember to always prioritize your safety gear, use the right tools, and take your time. Disconnecting your battery doesn’t have to be a source of anxiety; it can be another step in confidently maintaining your own vehicle. Happy wrenching!
Frequently Asked Questions
Which battery terminal to remove first, and why is it so important?
You should always remove the negative (-) battery terminal first. This crucial safety step prevents accidental short circuits, which can cause sparks, electrical damage, or even a battery explosion, thereby protecting both you and your vehicle.
What are the risks if I don’t remove the correct battery terminal first?
If you remove the positive (+) battery terminal first, there’s a significant risk of creating a short circuit. Should your wrench or tool accidentally touch any grounded metal part of the car’s frame while still connected to the live positive terminal, it can generate dangerous sparks, damage the vehicle’s electrical system, or cause personal injury.
How do I identify the negative battery terminal before I remove it first?
The negative battery terminal is typically marked with a minus sign (-) and usually has a black cable connected to it. This cable often leads directly to the vehicle’s chassis or engine block, serving as the ground connection.
Are there any exceptions to the rule about which battery terminal to remove first?
For standard 12-volt automotive batteries, the rule to remove the negative battery terminal first is a universal safety guideline that should always be adhered to. There are generally no common exceptions for typical vehicle maintenance tasks, so consistently prioritize this safety measure to avoid hazards.
What tools do I need to safely remove battery terminals?
To safely remove battery terminals, you will primarily need a wrench or a specialized battery terminal wrench that fits your battery posts. It is also highly recommended to wear safety glasses and gloves to protect against potential acid splashes or unexpected sparks.
After removing the correct battery terminal first, what’s the next step?
Once the negative battery terminal is safely disconnected and moved completely away from the battery, you can then proceed to remove the positive (+) battery terminal. After both terminals are disconnected, you can then loosen any hold-down clamps and carefully lift the battery out of its tray.