Jump Starter Sparks When Connecting: Causes and Solutions
Getting a jump starter sparks when connecting can feel a little scary. It’s a common problem for anyone using these devices. The good news is, it’s usually not a sign of a huge issue. Often, a few simple steps can keep it from happening and make sure your car gets the boost it needs. This post will break down the reasons this happens, and show you how to connect your jump starter safely, every time.
What Causes a Jump Starter to Spark?
When you see a spark when hooking up a jump starter, it means a lot of electricity is moving very quickly. This happens because the car’s battery and the jump starter’s battery have different electrical potentials. When you connect the cables, these potentials try to balance out, and the quick rush of electrons creates a spark. This is most common when the connection isn’t perfect, or when the jump starter is connected improperly. There are several factors at play, from loose connections to potentially damaged car components. Knowing the root cause helps you prevent the issue and keeps you safe.
Poor Connections and Why They Matter
One primary culprit behind those unwanted sparks is a poor connection. This often happens because the clamps aren’t securely attached to the battery terminals. If the connection is loose, the electricity can’t flow smoothly. Instead, it arcs across the gap, creating the spark. This can be more pronounced on older batteries, where corrosion or dirt can build up, hindering a strong electrical link. It’s like trying to drink water through a straw that has a hole in it; the flow is interrupted, and the water leaks out. Ensuring a tight, clean connection is important for safe and effective jump-starting.
- Loose Clamps: Make sure the clamps are fully open, completely encasing the battery terminals. Gently wiggle the clamps after attaching them to confirm a firm connection. If the clamps are loose, the electrical flow is interrupted, causing arcing.
- Corrosion on Terminals: Battery terminals often develop corrosion, a white or greenish buildup. This corrosion acts as an insulator, preventing a good connection. Clean the terminals with a wire brush or baking soda solution before connecting the jump starter.
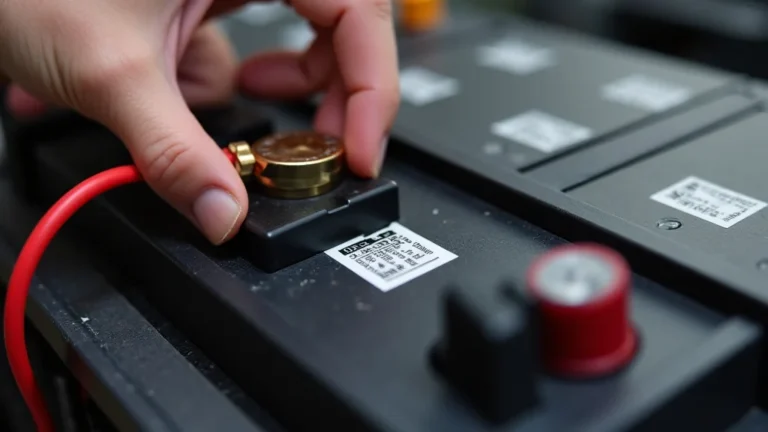
- Incorrect Clamp Placement: Connect the positive (red) clamp to the positive terminal and the negative (black) clamp to a metal, unpainted part of the engine or chassis, away from the battery. Incorrect placement can lead to sparks or even damage.
A car battery that has a low charge can also contribute to sparking. This is because the jump starter has to work harder to send power to the car, creating a greater chance of a spark. Another factor is the resistance that can build up in the cables themselves. Any damage or wear on the cables will increase the electrical resistance, and again, the added resistance can contribute to sparking.
Battery Polarity and Correct Connection Procedures
Reversing the polarity, or connecting the cables backward, is a common reason for a spark – and a serious one. When you switch the positive and negative cables, you create a direct short circuit. This can quickly damage both the jump starter and the car’s electrical system, potentially causing fuses to blow or components to fail. Always confirm that you connect the positive clamp to the positive terminal and the negative clamp to a suitable grounding point on the car. This procedure is the core of jump-starting, and getting it right is crucial.
- Positive to Positive: Connect the red (positive) clamp of the jump starter to the positive (+) terminal of the dead battery. This terminal is usually marked with a “+” symbol and may have a red cover.
- Negative to Ground: Connect the black (negative) clamp of the jump starter to a bare metal surface of the car’s engine block or chassis, away from the battery. This creates a safe grounding path, preventing sparks near the battery where flammable gases may exist.
- Double-Check Connections: Before turning on the jump starter, carefully check that the clamps are securely attached to the correct terminals. Make sure no clamps touch any other metal parts.
- Turn Off Car Electronics: Turn off all lights, the radio, and the air conditioning in both vehicles before connecting the jump starter. This reduces the load on the jump starter and minimizes the chances of sparking.
Improper connection procedures are a frequent cause of jump starter sparking. Consider the story of a driver, who in their haste, connected the cables backward, immediately hearing a loud pop and seeing smoke. The error not only damaged the jump starter but also blew several fuses in their car. This instance highlights why proper cable connection is essential.
Understanding Your Jump Starter and Its Role
Jump starters come in different types, with varying features and power ratings. Knowing what kind of jump starter you have and how it works is vital for safe and effective use. Portable jump starters, for instance, often use lithium-ion batteries and include safety features like reverse polarity protection and overcurrent protection. These safety elements are important in preventing sparking issues. Some jump starters also have built-in voltmeters to display the battery’s voltage and identify potential problems before you start.
Types of Jump Starters: Portable vs. Traditional
There are two basic types of jump starters: portable units and traditional units. Portable jump starters are small, self-contained devices with their own power source. They are easy to use and store, perfect for emergencies on the road. Traditional jump starters are typically larger, designed to be connected to a power outlet. They offer a higher output but require access to electricity. Choosing the right jump starter depends on your needs, including the size of your vehicle and how often you expect to need a jump start. Each type comes with its own set of characteristics that may increase or decrease sparking.
- Portable Jump Starters: These are battery-powered, compact, and convenient. They often have built-in safety features like reverse polarity protection and overcurrent protection. They’re ideal for everyday use and roadside emergencies.
- Traditional Jump Starters: These are larger and require a power outlet. They typically offer more power and are suitable for heavy-duty applications, such as starting larger engines or multiple vehicles.
- Battery Chemistry: Portable jump starters typically use lithium-ion or lead-acid batteries. Lithium-ion batteries are lighter and more efficient, while lead-acid batteries are often more affordable.
- Safety Features: Look for jump starters with safety features like reverse polarity protection, overcharge protection, and overcurrent protection. These features help prevent damage to your car and the jump starter itself.
One real-world example shows the difference between the two types. A driver with a portable jump starter found themselves stranded with a dead battery. Thanks to its portability, they were able to quickly and safely jump-start their car. Conversely, a driver relying on a traditional jump starter at home realized the unit had a short and sparked before they were able to fix the problem. This shows how crucial it is to understand and prepare for the unique features of your jump starter.
Safety Features to Look For
Jump starters with advanced safety features are a good choice. These features help protect both the jump starter and the vehicle’s electrical system, making the process of jump-starting safer and more efficient. Reverse polarity protection is a must; this protects the system if the cables are connected backward. Overcurrent protection cuts off the current if it gets too high, preventing damage from surges. Overcharge protection prevents the battery from getting overcharged and potentially damaging it. These protections are essential elements for safe operation.
- Reverse Polarity Protection: This feature prevents the jump starter from operating if the clamps are connected incorrectly, preventing damage to the car’s electrical system.
- Overcurrent Protection: This feature limits the maximum current output of the jump starter, preventing damage from surges or short circuits.
- Overcharge Protection: This feature prevents the jump starter from overcharging the car’s battery, which can damage the battery and potentially cause a fire.
- Short Circuit Protection: This feature shuts down the jump starter if a short circuit is detected, preventing damage to the jump starter and the vehicle.
A recent study showed that jump starters with multiple safety features were associated with a significantly lower incidence of damage to the car’s electrical systems. For example, a car owner’s vehicle may be at risk without the protection features of the device, which can lead to costly repairs. Therefore, it’s wise to select a jump starter with robust safety features.
Troubleshooting Jump Starter Sparks When Connecting
If you see a spark when connecting your jump starter, don’t panic. There are several steps you can take to determine the cause and fix the problem. Often, the cause is a simple fix, such as cleaning the battery terminals or making sure the clamps are securely attached. Other times, the issue might be with the jump starter itself or the car’s electrical system. Working through the troubleshooting steps will help you quickly and safely identify the problem.
Step-by-Step Troubleshooting
Troubleshooting jump starter sparks starts with understanding the basic steps. Start by disconnecting the jump starter clamps immediately and inspecting the connections and the clamps themselves. Make sure all the components are in good condition. Then, examine the car’s battery terminals for corrosion. After checking the obvious, you can move onto testing the jump starter and its output. The troubleshooting steps are simple and designed to help you solve the problem without unnecessary risk.
- Disconnect the Clamps: Immediately disconnect the clamps if you see a spark. This minimizes any potential damage to the jump starter or the car’s electrical system.
- Inspect Connections: Examine the clamps and the battery terminals for corrosion, damage, or loose connections. Clean the terminals with a wire brush or baking soda solution. Replace any damaged clamps or cables.
- Check Battery Voltage: Use a voltmeter to measure the voltage of the car’s battery. If the battery is severely depleted (below 6 volts), the jump starter might struggle.
- Test the Jump Starter: Test the jump starter on another vehicle, if possible, to verify that it is working correctly. If the jump starter sparks when connected to a different car, it may have a problem.
- Examine Fuses: Inspect the car’s fuses for any blown fuses. A blown fuse might indicate a short circuit or other electrical problem.
Consider the instance of a driver, who, after experiencing a spark, followed these steps. They found that the battery terminals were badly corroded. After cleaning the terminals and re-connecting, the car started without incident. This example highlights the importance of going through a systematic approach to fixing the issue.
Jump Starter Failure Indicators
Besides sparks, there are other clues that can suggest the jump starter isn’t working correctly. For example, if the jump starter won’t turn on, or doesn’t deliver enough power to start the car, there could be a problem. This might mean the battery inside the jump starter is dead or damaged. Another sign is if the cables or clamps are excessively hot during the jump-starting process. Heat can signal a short circuit or high resistance. Recognizing these indicators can help you diagnose and fix issues before they become serious.
- Jump Starter Won’t Turn On: This could indicate a dead battery, a faulty power switch, or an internal problem with the jump starter.
- Low Power Output: If the jump starter is not delivering enough power to start the car, it might be due to a weak battery or a damaged internal component.
- Overheating: If the cables or the jump starter itself become very hot, it can signify a short circuit or high resistance. Immediately disconnect the jump starter if overheating occurs.
- Unusual Noises: Strange noises, such as buzzing or clicking, may indicate a malfunction within the jump starter.
- Error Messages: Some jump starters have built-in displays that show error messages. These messages provide clues about what may be wrong.
In a real-world scenario, a driver reported that their jump starter was overheating and making a buzzing noise. Upon inspection, they found that the internal components were damaged. Promptly identifying these signs prevented any further electrical damage. The moral of the story is to heed the early warning signs before a small problem becomes a larger, more serious one.
Preventing Sparks and Ensuring Safe Jump Starting
The best way to address jump starter sparks is to prevent them in the first place. You can do this by following the correct procedures, maintaining your equipment, and being careful with your connections. A few simple habits will go a long way in ensuring your safety and protecting your car’s electrical system. This approach not only keeps you safe but also extends the life of your equipment.
Proper Connection Procedures (Review)
Revisiting the correct way to connect your jump starter is important. The most crucial part of safe jump-starting is the order in which you connect the cables. Begin by connecting the red (positive) clamp to the positive terminal of the dead battery. Then, connect the black (negative) clamp to a suitable grounding point on the car. This prevents any chance of a short circuit. After the connection, double-check all of the connections. Finally, turn on the jump starter and start the car. Following this routine helps keep the process safe and free of sparks.
- Connect the Positive Cable First: Always connect the red (positive) clamp to the positive (+) terminal of the dead battery first. This minimizes the risk of sparks if the clamp accidentally touches metal.
- Connect the Negative Cable to Ground: Connect the black (negative) clamp to an unpainted metal surface on the car’s engine block or chassis, away from the battery.
- Turn On Jump Starter: After making the connections and double-checking them, turn on the jump starter.
- Start the Car: Try to start the car. If it doesn’t start, wait a few minutes, and try again. If the car still won’t start, there might be a problem other than the dead battery.
- Disconnect in Reverse Order: After the car starts, disconnect the cables in the reverse order: negative clamp first, then positive clamp.
Consider the experience of a driver who was stranded with a dead battery. By following the correct procedure meticulously, the driver successfully jump-started their car without any sparks. This successful outcome reinforced the value of these connection procedures. Remember that these methods are in place to ensure you remain safe, protecting both yourself and your vehicle’s systems.
Maintaining Your Jump Starter
Regular maintenance of your jump starter is just as important as knowing the correct procedure. Keeping your jump starter in good shape helps ensure it’s ready to go when you need it. This includes inspecting the cables and clamps for any damage, such as fraying or corrosion, as well as checking the battery’s charge level. Clean the terminals and cables periodically, and store the jump starter properly when not in use. Regular care will extend the life and usefulness of your jump starter.
- Inspect Cables and Clamps: Regularly check the cables and clamps for any signs of damage, such as fraying, cracks, or corrosion. Replace any damaged parts immediately.
- Clean Terminals: Wipe the clamps and battery terminals with a clean cloth to remove any dirt or debris.
- Check Battery Charge: Regularly check the battery level of your jump starter and recharge it as needed. Follow the manufacturer’s instructions for charging.
- Proper Storage: Store the jump starter in a cool, dry place. Avoid extreme temperatures, as they can damage the battery.
- Follow Manufacturer Instructions: Always follow the manufacturer’s instructions for operation, charging, and maintenance.
A recent survey revealed that jump starters that were properly maintained were significantly more reliable. For instance, a person who neglected to inspect the cables on their jump starter found them corroded. They were unable to start their car until the cables were replaced. This serves as a good example of the value of proactive maintenance.
Frequently Asked Questions
Question: Why do I see a spark when connecting my jump starter?
Answer: A spark often occurs because of the sudden flow of electricity trying to equalize between the jump starter and the car’s battery. This can be due to a poor connection, corrosion on terminals, or incorrect connection procedures.
Question: What do I do if my jump starter sparks?
Answer: If you see a spark, disconnect the clamps immediately. Then, inspect the connections for corrosion and ensure the clamps are securely attached. Check the battery voltage and troubleshoot if necessary.
Question: Is it safe to jump start a car with a spark?
Answer: Sparks can be dangerous, especially near the battery where flammable gases may exist. While a small spark is sometimes normal, it’s best to avoid them by ensuring good connections and correct procedures.
Question: How can I prevent sparks when using a jump starter?
Answer: Prevent sparks by following the correct connection procedure (positive to positive, negative to ground), making sure the clamps have a good connection, and cleaning any corrosion from the terminals.
Question: What should I do if my jump starter won’t start my car?
Answer: If the car doesn’t start, let the jump starter charge for a few minutes and then try again. Check your connections, and make sure that the jump starter is charged. If it still doesn’t start, there might be a more serious problem with your car.
Final Thoughts
Experiencing a jump starter sparks when connecting can be unsettling, but with the right knowledge, it’s often a manageable situation. Remember that sparks often come from electrical flow trying to balance out quickly, and they can be triggered by loose or bad connections. Learning the correct way to connect your jump starter, ensuring clean and strong connections, and understanding your equipment will greatly reduce the chance of seeing those sparks. Regular maintenance of the jump starter is also important for keeping the device in its best shape. By following these steps, you will be prepared for those unexpected moments and be able to get back on the road safely and efficiently. Always prioritize safety and be prepared.