How to Use a Car Battery Charger Safely and Effectively
Figuring out how to use a car battery charger might seem hard at first, but don’t worry! It’s actually pretty simple once you know the basics. Many people get confused because they’re not sure about the different parts or the order of operations. This post is all about making things clear and easy to follow. We’ll go step-by-step, showing you exactly what to do. Get ready to learn how to keep your car battery charged and ready to go!
Choosing the Right Charger and Preparing Your Car
Picking the right car battery charger is the first important thing. You want one that fits your car’s needs. There are many different types out there, so it’s good to know a bit about them. This section will help you pick the best charger and get your car ready for the process. We will look at things like voltage, amperage, and safety features.
Types of Car Battery Chargers
There are different types of car battery chargers, each with its own benefits. Knowing these can help you decide which one is right for you. Some are simple and easy to use, while others are more advanced and have more features. The main types are discussed below.
- Manual Chargers: Manual chargers are the most basic type. You have to set the charging rate yourself. This means you control how much power goes into the battery. They’re often more affordable, but you need to pay attention to avoid overcharging. Overcharging can damage the battery. They usually have a dial or switch for adjusting the amperage. If the amperage is too high, it can lead to overheating. If it’s too low, the battery might not charge quickly enough. You should always read your car battery’s instructions.
- Automatic Chargers: Automatic chargers are more convenient. They sense the battery’s needs and adjust the charging rate. This helps prevent overcharging and damage. They also often have safety features like reverse polarity protection. Reverse polarity happens when the charger cables are connected backwards. Automatic chargers are generally more expensive but safer and easier to use. Many have displays that show the charging progress.
- Smart Chargers: Smart chargers are the most advanced. They use microprocessors to monitor and manage the charging process. They can test the battery’s condition, charge it, and maintain it. They often have multiple charging modes for different battery types. They can even “desulfate” the battery. Desulfation removes sulfate crystals that build up and reduce performance. Smart chargers are the most expensive but provide the best care for your battery.
- Trickle Chargers: Trickle chargers provide a small, steady charge over a long period. They’re good for maintaining a battery’s charge. This is useful for vehicles stored for extended periods. They supply a very low current. It’s like a small “trickle” of electricity. They prevent the battery from discharging. They’re very safe and easy to use. Trickle chargers are also very affordable. They often lack advanced features, like battery testing.
Safety First: Preparing Your Work Area
Before you plug in that charger, safety should be your main focus. Working with electricity demands caution. Proper preparation can prevent injuries. Setting up your workspace correctly means you’re less likely to have problems. Ensure you’re in a well-ventilated space. Car batteries can release gases during charging. These gases can be harmful. Let’s make sure everything is safe before we start charging.
- Ventilation: Charge your car battery in a well-ventilated spot, like outside or in a garage with the door open. This is key because batteries can release hydrogen gas during charging. If this gas builds up, it could cause an explosion. A well-ventilated area keeps the air flowing, so the gas doesn’t accumulate. If you’re indoors, open windows and doors to let the fresh air in.
- Eye Protection: Always wear safety glasses or goggles. Car batteries contain acid, which can splash and cause serious eye damage. Eye protection shields your eyes from this risk. Make sure your glasses fit well and cover your eyes completely. Check for any damage or scratches on the glasses before use. If you don’t have safety glasses, consider purchasing some before you begin.
- Protective Clothing: Wear old clothes and gloves. Battery acid can ruin clothes and cause skin burns. Gloves protect your hands from acid splashes. Long sleeves and pants are good to have as well. If you get acid on your skin, wash it off with water immediately. If it’s your clothes that get acid on them, wash them separately to protect other clothes.
- Clear the Area: Make sure your work area is clear of anything that could cause a spark. This includes flammable materials, like gasoline or oil. Sparks can ignite the hydrogen gas released by the battery. Keep your work area tidy. Put away tools and other objects you don’t need. A clean work area is a safe work area.
- Read the Manual: Always read the charger’s manual. Each charger is a little different. The manual has important instructions and safety warnings. It tells you how to use the charger correctly. It will also outline any special precautions you need to take. Do this before you start.
Battery Inspection: Before You Connect
Before connecting the charger, take a look at your battery. A good inspection can help you spot any problems. This step helps prevent issues during charging. Look for any signs of damage or wear. Identifying these issues can prevent more serious problems.
- Check for Cracks: Look closely at the battery case for any cracks or leaks. Cracks can allow acid to leak out, which is dangerous. If you see any cracks, replace the battery instead of charging it. Acid leaks can cause damage to other parts of your car. Even small cracks can lead to major problems.
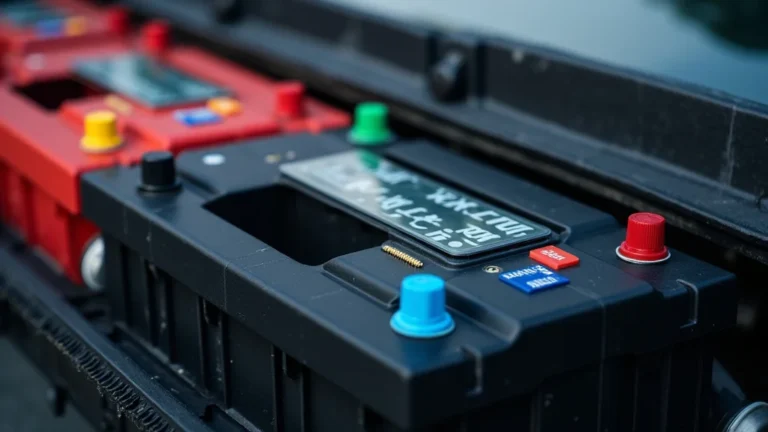
- Clean the Terminals: Battery terminals often get corrosion on them. Corrosion is a white or greenish buildup. It can interfere with the connection. Clean the terminals with a wire brush or a special battery terminal cleaner. Make sure the terminals are clean and shiny for a good connection. This helps the charger work efficiently.
- Check the Electrolyte Level (If Applicable): Some batteries have caps that let you see the electrolyte. The electrolyte is the liquid inside the battery. If the level is low, add distilled water to the correct level. Never use tap water because it can damage the battery. This ensures the battery functions properly.
- Inspect the Cables: Check the charger cables for any damage, like fraying or cuts. Damaged cables are a safety hazard. If you see any damage, don’t use the charger. Replace the cables or get a new charger. Damaged cables can cause sparks or even electric shock.
- Note the Battery Type: Figure out what type of battery you have. Some chargers need to be set for different battery types (e.g., lead-acid, AGM, gel). Setting the charger to the wrong type can damage the battery. Find the battery type on the battery itself or in your car’s manual. Make sure your charger can handle the battery type.
Connecting Your Charger: The Right Way
Now, let’s connect the charger to the battery. This is where you actually hook up the charger to your car. Getting this step correct is very important for safety and effective charging. Pay close attention to the order and the connection points. Following these steps helps avoid any electrical mishaps. Proper connections guarantee your battery gets the correct power.
Step-by-Step Connection Guide
Follow these steps to safely connect your battery charger. This method minimizes risks and helps ensure that the charging process starts correctly. Make sure you read through the steps. Prepare everything you need before you begin.
- Turn Off the Charger: Make sure the charger is turned off before you start. This prevents any accidental sparks when you connect the clamps. It’s a simple safety measure. You should also ensure the car’s ignition is turned off.
- Connect the Positive Cable: Find the positive terminal on your battery. It’s usually marked with a “+” symbol and often has a red cap. Attach the red clamp from the charger to this positive terminal. Make sure the clamp is secure. If it’s loose, it won’t conduct electricity properly.
- Connect the Negative Cable: Now, find the negative terminal on the battery. It is often marked with a “-” symbol and might have a black cap. Connect the black clamp from the charger to the negative terminal. Again, make sure the clamp is tightly connected.
- Plug in the Charger: Plug the charger into an electrical outlet. Make sure the outlet is working. If the outlet is faulty, the charger won’t work, or it could cause a hazard. The charger will now start to charge your battery.
- Turn On the Charger: Turn the charger on after it is plugged in. Some chargers have a power button or switch. Once it is on, the charger will start sending power to the battery. Make sure you have set the charger to the correct mode for your battery type.
Dealing With Reverse Polarity
Reverse polarity is when you connect the charger’s cables backward. This is a common mistake, but it can be dangerous. Many chargers have built-in protections against reverse polarity. You still want to avoid it. Knowing how to prevent it and what to do if it happens is very useful.
- Check the Symbols: Always double-check the “+” and “-” symbols on both the battery and the charger before connecting. Make sure you match the positive to positive and negative to negative. This step is the best way to prevent the problem.
- Use Color Coding: Most chargers use color-coded cables. Red is positive, and black is negative. Use the colors to help you match the cables to the correct terminals. This makes it easier to connect correctly. If the colors don’t match, double-check everything.
- If You Accidentally Reverse the Cables: If you realize you connected the cables backward, immediately disconnect the charger from the outlet. Then, carefully disconnect the clamps from the battery. Correct the connection, making sure the red clamp is on the positive terminal and the black clamp is on the negative terminal. Then, plug the charger back in.
- Charger Safety Features: Most modern chargers have built-in reverse polarity protection. The charger won’t start charging if the cables are connected backward. This can save you from damage. Some chargers will show an error message if the polarity is wrong. If your charger has this feature, it can help prevent any damage.
- Check for Fuses: Some chargers have fuses that can blow if the polarity is reversed. If the charger does not work, check the fuse. Replace the fuse if it has blown. Refer to the charger’s manual.
Charging and Monitoring the Battery
After you have hooked up your charger, it is time to charge your battery. This section covers how to set the charging rate and monitor the progress. During charging, make sure to watch for any problems. Following these guidelines helps ensure your battery charges properly. Paying close attention to the details helps you avoid common charging problems.
Setting the Charging Rate
The charging rate is how much power your charger gives to the battery. Setting the right charging rate is key to charging the battery correctly. The charger’s setting can affect how quickly the battery charges. Knowing the right rate helps to keep the battery in good condition.
- Read the Battery’s Instructions: Your battery should have instructions on how much charging current it needs. Check your battery. You can usually find this information in the battery’s manual. The manual will often recommend the ideal charging rate, which helps avoid overcharging or undercharging.
- Amperage Guidelines: A general rule is to charge at a rate of about 10% of the battery’s amp-hour (Ah) rating. For example, a 50 Ah battery should charge at about 5 amps. This rate provides a good balance between charging time and battery health. If you are using a trickle charger, it may be a lower rate. The battery’s manual will provide a precise charging rate.
- Use Automatic Chargers: Automatic chargers will select the charging rate for you. They determine the correct rate based on the battery’s condition. These chargers make it easy to charge the battery safely. They adjust the charging rate as needed.
- Monitor the Process: Always keep an eye on the battery while it is charging. Make sure the charger is working correctly. Watch out for any unusual signs. Check the battery’s temperature. It should not get too hot. If you notice any problems, stop charging immediately.
- Adjust if Necessary: If you are using a manual charger, you might need to adjust the charging rate. If the battery is not charging, increase the amperage. If the battery is getting too hot, reduce the amperage. Pay close attention.
Monitoring the Charging Process
Keep a close watch on your battery while it is charging. This includes checking for signs of trouble. It also includes tracking the charging time. Monitoring helps you ensure the battery charges properly. It also allows you to catch any potential issues early. Regular checks prevent damage to the battery and the car.
- Check the Charger’s Display: Many chargers show the charging status. They can display the voltage, amperage, and charging time. Use these displays to track the progress. Keep an eye on the charger’s readings to see how the battery is charging. The display can let you know if something is wrong.
- Feel the Battery: Check the battery’s temperature. The battery might get slightly warm, but it should not become hot to the touch. If the battery gets too hot, stop charging. This is a sign of a problem, such as overcharging. Let the battery cool down before trying to charge it again.
- Listen for Unusual Sounds: Listen for any strange sounds coming from the battery. These could include hissing or gurgling. Such sounds can be a sign that something is wrong. If you hear anything unusual, stop charging and inspect the battery.
- Watch for Bubbling: In some batteries, you might see bubbles forming in the electrolyte. This is normal during charging, but excessive bubbling could be a sign of overcharging. If you see too many bubbles, reduce the charging rate or stop charging.
- Check the Voltage: Use a voltmeter to check the battery’s voltage while it is charging. When the battery is fully charged, the voltage will reach its maximum level (usually around 12.6 to 12.8 volts). This helps you determine when the battery is charged. Knowing the voltage helps prevent overcharging and protects the battery.
Disconnecting and Aftercare
After your car battery has charged, it is essential to disconnect the charger carefully. This section provides detailed steps on how to do this safely. It also provides maintenance tips. Careful steps make sure the car battery is ready for use. By following these steps, you will extend the life of your car battery.
Safe Disconnection Procedure
Follow the steps to remove the charger safely and correctly. Disconnecting the charger can prevent any unexpected issues. Careful steps also make sure the battery is ready for use. Following these tips helps to maintain the battery.
- Turn Off the Charger: Turn off the charger and unplug it from the wall outlet. This prevents any electrical hazards as you disconnect the clamps. This is important for your safety. Always turn off the charger before you remove the clamps.
- Disconnect the Negative Cable First: Remove the black clamp from the negative terminal first. This minimizes the risk of sparks. Remove the black clamp before the red clamp to be safe. It’s also the usual order to take the clamps off. This simple step can prevent electrical shorts.
- Disconnect the Positive Cable Next: Carefully remove the red clamp from the positive terminal. Be sure the clamp is fully disconnected. Remove the red clamp after the black clamp.
- Clean the Terminals: If you did not clean the terminals before, now is the time to do it. Use a wire brush or battery terminal cleaner. Remove any corrosion or buildup. Clean terminals help maintain a good connection. This helps improve the battery’s performance.
- Inspect the Cables: After you have removed the clamps, check the cables for damage. Examine the cables for fraying, cuts, or any other wear and tear. If you see any problems, replace the cables. Use new cables to make sure the charger works safely.
Battery Maintenance for Optimal Performance
Taking care of your car battery will help you get the most out of it. Following these tips will help extend the life of your car battery. With a few simple steps, you can prevent problems and keep your battery running well. Here are some of the easy ways you can take care of your battery.
- Keep Terminals Clean: Clean your battery terminals regularly. Corrosion can build up over time. Use a wire brush or battery terminal cleaner. Make sure the terminals stay clean. This helps maintain a good connection and lets your car start easily. Clean terminals are key for reliable performance.
- Check Battery Fluid Levels (If Applicable): If your battery has caps, check the fluid levels periodically. Top off with distilled water if the levels are low. Avoid using tap water. Tap water can damage your battery. Check the levels every few months to maintain the battery’s performance.
- Prevent Discharge: Avoid leaving lights on or accessories running when the engine is off. These can drain the battery. Turn off lights, radios, and other electronics when you leave your car. These simple steps prevent battery discharge and help extend its life.
- Check the Charging System: Have your car’s charging system checked. A bad alternator can slowly drain the battery. Check the alternator and other parts of the charging system. Doing this will prevent the battery from discharging. A well-functioning charging system will keep the battery healthy.
- Consider a Battery Tender: A battery tender can keep your battery charged if you don’t drive your car often. Connect the tender to the battery. A battery tender gives a small amount of current to the battery. This helps the battery stay charged. It’s useful for cars that are stored for long periods.
Frequently Asked Questions
Question: Can I charge my car battery while it’s still in the car?
Answer: Yes, you can usually charge your car battery while it’s in the car, but make sure the car is turned off. Some chargers are designed to be used this way, but it is important to connect the charger clamps correctly. Make sure you don’t connect the charger to any metal parts. Read the charger’s manual for specific instructions.
Question: How long does it take to charge a car battery?
Answer: Charging time depends on the battery’s size and how discharged it is. A small battery might take a few hours to charge. A larger or very discharged battery might take 12 hours or more. The charger’s amperage also affects charging time. Always refer to your battery’s manual for estimated times and charging rates.
Question: What does it mean when my battery is sulfated?
Answer: Sulfation means that sulfate crystals have formed on the battery plates. This happens when the battery isn’t fully charged. Sulfation can reduce the battery’s performance and lifespan. You might notice your car has trouble starting or the battery doesn’t hold a charge for long. Using a smart charger with a desulfation mode can sometimes help to reverse this process.
Question: Can I overcharge my car battery?
Answer: Yes, overcharging is possible, especially with manual chargers. Overcharging can damage your battery, causing it to overheat. Overcharging will often reduce the life of your battery. That’s why it is useful to use an automatic or smart charger. These chargers stop charging when the battery is full.
Question: What should I do if my car battery keeps dying?
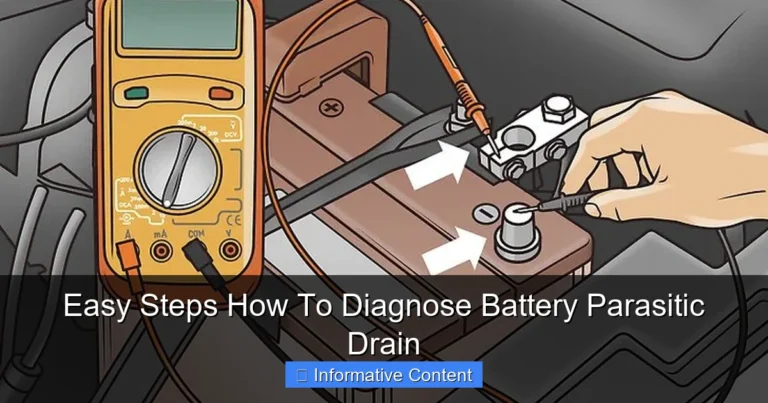
Answer: If your battery keeps dying, there might be a problem with your car’s charging system or the battery itself. Have your battery and alternator tested. Check for any parasitic drains, which are electrical components that draw power even when your car is off. Make sure the battery terminals are clean and tight. Also, make sure that there are no lights or other devices left on in the car.
Final Thoughts
Learning how to use a car battery charger is a useful skill. This skill can keep your car running. You have explored the main steps: choosing the right charger, preparing your car, connecting the charger, monitoring the charging, and disconnecting it. Remember safety, like making sure your work area is safe and following the right order when you connect and disconnect the clamps. By watching the charging process and keeping your battery clean, you can improve its lifespan. Now you’re all set to take care of your battery and keep your car going! Go ahead and start charging confidently!