Easy Steps How To Diagnose Battery Parasitic Drain
Featured image for how to diagnose battery parasitic drain
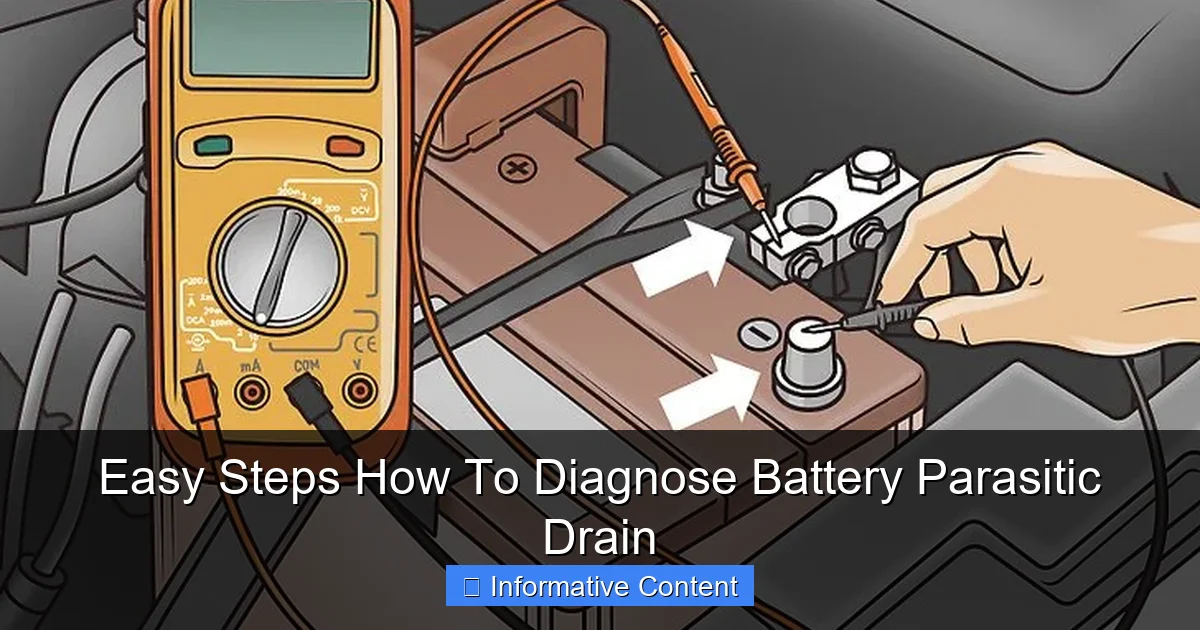
Image source: wikihow.com
Effectively diagnosing battery parasitic drain requires a systematic approach using a multimeter to isolate the faulty circuit. Start by connecting a multimeter in series between your negative battery post and cable, then meticulously remove fuses one by one while monitoring for a significant drop in current draw. This methodical fuse-pulling technique will pinpoint the exact circuit causing your unwanted power loss, guiding you to the hidden culprit.
Have you ever woken up, full of enthusiasm for your day, only to find your car battery completely dead? It’s a frustrating, deflating feeling, isn’t it? One day your car starts perfectly, the next it’s as lifeless as a brick. While sometimes it’s just an old battery giving up, often the culprit is something sneakier: a battery parasitic drain. This means something in your car is slowly, silently, sipping power from your battery even when the car is turned off.
It can feel like your car has a secret, tiny vampire attached to its electrical system. But don’t worry! Diagnosing a battery parasitic drain isn’t as intimidating as it sounds. With a few basic tools and a bit of patience, you can absolutely track down what’s draining your battery. Think of me as your friendly guide, walking you through the process step-by-step. Let’s get your car back to full health and save you from those unwelcome dead battery surprises!
Key Takeaways
- Preparation is Key: Disconnect accessories and allow vehicle modules to sleep.
- Set Up Multimeter: Connect multimeter in series between negative terminal and battery post.
- Establish Baseline: Allow vehicle to “sleep” before recording accurate parasitic draw.
- Acceptable Drain: A normal parasitic drain is typically under 50mA.
- Fuse Pull Method: Systematically remove fuses, observing multimeter for current drop.
- Check Common Culprits: Inspect interior lights, glove box, and trunk for lights left on.
- Circuit Isolation: Once a fuse is found, systematically disconnect components to pinpoint fault.
📑 Table of Contents
Understanding What a Battery Parasitic Drain Is
The Silent Killer
Imagine leaving a light on in your house overnight. Eventually, it would run up your electricity bill, right? A battery parasitic drain is similar, but instead of your wall outlet, it’s your car battery that’s paying the price. It’s any electrical component that continues to draw current from your car’s battery even when the ignition is off and everything should be shut down. A small amount of drain is normal – your car’s computer, clock, and alarm system need a tiny bit of power to remember things. But too much drain, and your battery will be flat in no time.
Common Culprits
Many things can cause an excessive battery parasitic drain. Sometimes it’s obvious, like an interior light left on. Other times, it’s more subtle. Think about aftermarket accessories you’ve installed, like a new radio, an alarm system, or even a USB charger that’s wired incorrectly. Original equipment can also be at fault: a sticky relay, a faulty glove box light switch, or a trunk light that never turns off can all lead to a drain. Even a short in a wiring harness could be the problem.
Essential Tools for the Job
Before we dive in, let’s gather our gear. You won’t need a professional garage full of equipment, just a few key items that are handy for any DIY car enthusiast.
Your Trusty Multimeter
This is your main detective tool! You’ll need a digital multimeter that can measure amperage (current) in milliamps (mA) and amps (A). Most modern multimeters can do this. Make sure it has fresh batteries so you get accurate readings.
Other Handy Items
- Wrench or socket set: You’ll need this to disconnect your car’s battery terminal.
- Pen and paper: Crucial for taking notes, especially when you start pulling fuses. Trust me, you won’t remember everything!
- Battery charger (optional, but recommended): If your battery is already low, charge it fully before starting. A fully charged battery gives you a better baseline for testing the battery parasitic drain.
- Safety glasses and gloves: Always a good idea when working with car batteries.
Preparing for the Test
Safety first, my friend! And then, a little preparation goes a long way to making this test smooth and accurate.
Safety First, Always
Working with car batteries involves electricity and sometimes corrosive chemicals. Please wear safety glasses and gloves. Avoid touching both the positive and negative terminals at the same time, especially with metal tools. It’s smart to remove any metal jewelry like rings or watches too.
Getting Your Car Ready
This part is critical for an accurate reading of any battery parasitic drain.
- Turn everything off: Make sure the ignition is off, all lights (interior, exterior), the radio, climate control, and any accessories are completely off.
- Close all doors, trunk, and hood (mostly): We need to simulate the car being parked and locked up. However, you’ll need the hood open to access the battery and fuse box. If your car has a hood switch that turns on a light or activates an alarm, you might need to manually depress it or trick it into thinking the hood is closed.
- Remove the ignition key: Take the key out of the ignition.
- Wait for the car to “sleep”: This is super important! Modern cars have complex computer systems (ECUs) that stay active for a while after you turn off the car. They need to power down, or “go to sleep,” before you can get an accurate parasitic drain reading. This can take anywhere from 10 minutes to over an hour, depending on the vehicle. Be patient! Walk away, grab a coffee, and come back.
The Multimeter Test: Step-by-Step
Alright, let’s connect the multimeter and see what your car is secretly sipping!
Connecting the Multimeter
- Set your multimeter: Turn the dial to measure current (amperage). You’ll typically see “A” for amps or “mA” for milliamps. Start with the highest amperage setting (often 10A or 20A) to prevent blowing a fuse in your multimeter if there’s a large drain. If your initial reading is very low, you can switch to a lower mA setting for more precision.
- Relocate the red probe: The red probe (positive) of your multimeter usually plugs into the “VΩmA” port. For measuring amps, you often need to move it to a dedicated “A” or “10A” port. Double-check your multimeter’s manual for this!
- Disconnect the negative battery terminal: Using your wrench, loosen and remove the negative (usually black) cable from your car’s battery post. Make sure it doesn’t accidentally touch the battery post again.
- Connect the multimeter in series: This is the crucial step. You want the multimeter to become part of the circuit.
- Connect the red (positive) multimeter lead to the now-disconnected negative battery cable.
- Connect the black (negative) multimeter lead to the negative battery post.
Now, any current leaving the negative battery post must flow through your multimeter to get to the car’s electrical system. You should see a reading on your multimeter.
Interpreting the Readings
Once connected, and after the car has had time to “sleep,” look at your multimeter display.
An acceptable battery parasitic drain for most modern vehicles is typically between 20-50 milliamps (0.02-0.05 amps). Some manufacturers might allow up to 75 mA. If your reading is significantly higher than this (e.g., 100 mA, 200 mA, or even amps), you definitely have an excessive parasitic drain that needs to be found.
Pinpointing the Culprit
Now for the detective work! With your multimeter showing a higher-than-normal drain, it’s time to systematically narrow down the problem.
The Fuse Pulling Method
This is the most common and effective way to find the source of a battery parasitic drain.
- Locate your fuse boxes: Most cars have at least two fuse boxes – one under the hood and one inside the cabin (often under the dash or on the side of the dashboard). Consult your owner’s manual to find them.
- Start pulling fuses, one by one: With the multimeter still connected and displaying the high drain, begin removing fuses, one at a time. After you pull a fuse, watch your multimeter.
- Reinsert the fuse: If pulling a fuse does NOT cause the amperage reading to drop significantly, put that fuse back in its spot and move on to the next one. This is why pen and paper are so useful – you can mark which fuses you’ve checked.
- Identify the guilty circuit: When you pull a fuse and the amperage reading on your multimeter suddenly drops to an acceptable level (e.g., below 50 mA), you’ve found the circuit that contains your parasitic drain!
Watch the Amperage Drop
The moment that high reading drops, make a note of which fuse you pulled. Look at your car’s fuse diagram (usually inside the fuse box cover or in your owner’s manual) to identify what components are on that specific circuit. This will give you a major clue about where to investigate further. For example, if pulling the “RADIO” fuse makes the drain disappear, you know the problem is related to your car’s audio system. If it’s the “DOME” light fuse, check all interior lights, trunk light, and glove box light. Sometimes, it could even be a module connected to that circuit that isn’t shutting down properly.
What to Do After You Find the Drain
Congratulations, detective! You’ve identified the circuit causing your battery parasitic drain. Now what?
Addressing the Issue
Once you know which circuit is faulty, your next step is to investigate the components on that circuit.
- Check for obvious problems: Is a light physically staying on? Is an aftermarket accessory still powered?
- Inspect wiring: Look for frayed wires, loose connections, or signs of corrosion.
- Test individual components: If it’s a component like a relay, switch, or module, you might need to test it or replace it. For example, if the radio circuit is draining, you might disconnect the radio itself to confirm it’s the culprit.
- Professional help: If you’re not comfortable replacing parts or tracing wires within a circuit, or if the problem is deep within a complex module, it’s totally okay to take your car to a trusted mechanic. You’ve already done most of the diagnostic work for them, which should save you some money!
Preventing Future Drains
Once your current battery parasitic drain is fixed, here are a few tips to keep future issues at bay:
- Be mindful of accessories: Always ensure aftermarket accessories are installed correctly and power down with the car.
- Double-check lights: Make it a habit to quickly scan your interior for any lights left on before you walk away.
- Regular maintenance: Keeping your car well-maintained can prevent many electrical issues before they start.
- Disconnect when storing: If you plan to store your car for an extended period, consider using a battery tender or disconnecting the battery completely to avoid any unexpected drain.
There you have it! Diagnosing a battery parasitic drain might seem like a daunting task at first, but by following these easy steps, you can confidently track down the culprit and restore your car’s electrical health. Remember, a little patience and the right tools are all you need. You’ve got this, and soon, those dead battery surprises will be a thing of the past!
Frequently Asked Questions
What exactly is a battery parasitic drain?
A battery parasitic drain occurs when electrical components in your vehicle continue to draw power even after the engine is turned off. This constant, low-level power draw can slowly deplete your car battery, leading to a dead battery over time if left unaddressed.
What are the common signs that my car has a parasitic drain?
The most common sign is a dead battery, especially after your car has been sitting for a few days or even overnight. You might also notice dimming lights, slow cranking, or a persistent smell of electrical burning in some more severe cases of a parasitic drain.
What tools do I need to diagnose a battery parasitic drain effectively?
To diagnose a battery parasitic drain, you’ll primarily need a digital multimeter capable of measuring amperage (DC amps) accurately. Additionally, having a set of automotive fuses, a fuse puller, and possibly a wiring diagram for your specific vehicle can be very helpful.
How do I perform a basic parasitic drain test with a multimeter?
First, ensure your car is completely off and all doors are closed, simulating a parked state. Disconnect the negative battery terminal and connect your multimeter in series between the negative battery post and the disconnected negative battery cable, set to measure DC amps. Wait for the vehicle’s computer to “sleep” before reading the current draw.
What is considered an acceptable level of parasitic drain for a typical car?
For most modern vehicles, an acceptable parasitic drain is generally between 20 to 50 milliamps (mA). Anything consistently above 50-75 mA, especially after the car has gone to sleep, usually indicates a problem that needs investigation to prevent battery discharge.
What are some common culprits behind a battery parasitic drain in a vehicle?
Common causes of a battery parasitic drain include faulty aftermarket accessories, a sticking glove box or trunk light switch, a malfunctioning relay, or even issues with components like the radio, alarm system, or navigation unit. Sometimes, a short in the wiring or a faulty module can also be the culprit.