Battery Charger Voltage Too Low Troubleshooting Guide
Having a battery charger voltage too low can be a common frustration, especially if you’re new to working with batteries and chargers. This issue can stop your devices from charging properly, leaving you with dead batteries and a feeling of annoyance. But don’t worry! This guide is here to help. We’ll explore the reasons why this happens and give you a simple, step-by-step approach to get your charger and batteries working again. Let’s find out how to fix it!
What Causes Battery Charger Voltage to Drop?
A low voltage from your battery charger can happen for several reasons. Often, it’s not a major fault but a simple issue that can be easily addressed. It could be problems with the charger itself, the battery, or even the connections between them. A low voltage means the charger isn’t delivering enough power to effectively charge your battery. This can lead to slow charging or a battery that won’t charge at all. To solve this, we need to explore common culprits and understand why the voltage is low.
Faulty Charger Components
Chargers contain several components that can fail over time. The most common issues involve internal circuits and transformers, which convert household AC power into the lower voltage DC power needed for charging. Damage, such as a burnt-out resistor or a failing capacitor, can reduce the charger’s output voltage. Additionally, the charger might have a broken diode, which also reduces voltage. If these internal parts fail, the charger can’t deliver the correct voltage to the battery, leading to undercharging or no charging at all. It is important to inspect the charger carefully.
- Transformer Failure: The transformer steps down the AC voltage from your wall outlet. A faulty transformer will provide a lower output voltage. Replacing the transformer may be necessary.
- Capacitor Issues: Capacitors are crucial for filtering and smoothing the DC voltage. A bad capacitor can cause the output voltage to fluctuate or drop significantly. Replacing the capacitors is often a simple fix.
- Diode Problems: Diodes convert AC to DC. A failing diode can prevent proper voltage conversion, affecting the charger’s output. These are easy to test with a multimeter.
- Resistor Damage: Resistors manage current flow within the charger. If they fail, they can disrupt the voltage supply. Replacing them might be needed.
Battery Problems
Sometimes, the battery itself is the cause of the problem. Old, damaged, or sulfated batteries can have high internal resistance. This resistance hinders the flow of electricity, causing the charger to show a lower voltage reading. Also, a deeply discharged battery can also initially show a lower voltage. The charger might detect this low starting voltage and either not initiate charging or charge at a reduced rate. Understanding the condition of your battery helps you better diagnose and fix your battery charger voltage issues.
- Battery Sulfation: This happens when sulfate crystals form on the battery plates, increasing resistance. This often happens if the battery isn’t charged fully for long periods.
- Internal Shorts: Shorts within a battery reduce its ability to hold a charge. This results in the battery pulling less current, making the charger output seem lower.
- Age and Wear: Batteries lose their ability to hold a charge with age. The internal resistance rises, which can cause the charger to display low voltage.
- Deep Discharge: Letting a battery fully discharge can cause damage and reduce its voltage. The charger might be unable to jump-start the battery.
Checking Your Battery Charger Voltage
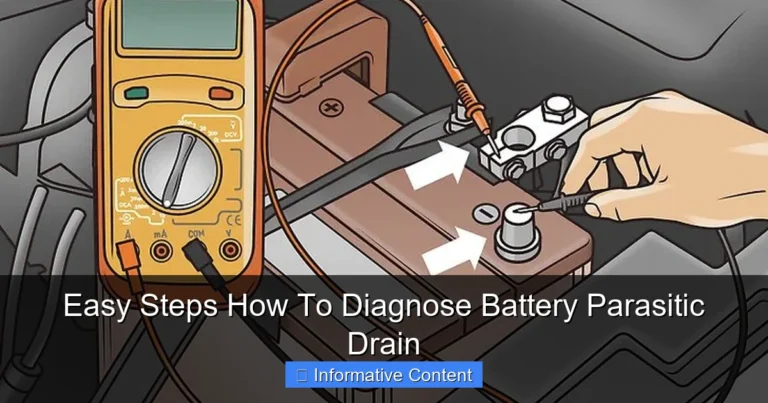
Checking the voltage output of your battery charger is a crucial first step when you suspect a problem. This simple process allows you to determine if the charger is actually delivering the correct voltage or if the output is lower than expected. You’ll need a multimeter, a small, handheld device that measures electrical voltage, current, and resistance. Properly using a multimeter will help diagnose whether the charger or the battery is causing the issue. This will help you know the voltage output immediately.
Using a Multimeter to Measure Voltage
A multimeter is your best friend when troubleshooting electrical problems. It’s a fairly simple tool, but using it correctly is important. Set the dial to the DC voltage setting that is slightly higher than the charger’s rated output voltage (e.g., if your charger outputs 12 volts, set the multimeter to 20V DC). Then, connect the red probe (positive) to the positive terminal of the charger and the black probe (negative) to the negative terminal. Read the display. The reading should closely match your charger’s voltage rating. Any significantly lower reading indicates a potential problem.
- Safety First: Always unplug the charger before testing. Do not touch the probes to yourself or any conductive surfaces while the charger is plugged in.
- Setting the Multimeter: Make sure your multimeter is set to DC voltage.
- Probe Placement: Carefully connect the probes to the charger terminals, ensuring a good connection.
- Interpreting Results: A reading much lower than the charger’s rating means there’s a problem.
- Testing Under Load: If possible, test with a battery connected to see how the voltage changes.
Interpreting the Voltage Readings
What the multimeter shows is vital. If the voltage is significantly lower than the charger’s rating (e.g., 9V instead of 12V), the charger may be faulty. A fluctuating or unstable reading also suggests a problem. If the voltage is normal, the issue might lie in the battery. Make sure you know what voltage your charger is supposed to output, or you may misinterpret the readings. This way, you can narrow down the potential issues.
- Normal Voltage: This means the charger is working fine. Check the battery next.
- Low Voltage: Indicates a charger fault. Inspect the charger or replace it.
- Fluctuating Voltage: A sign of internal problems, such as a loose connection or a failing component within the charger.
- Zero Voltage: The charger might be completely broken or not getting power. Check the power supply and charger connections first.
Troubleshooting Steps for Battery Charger Voltage Problems
Once you’ve checked the voltage, you can take a few steps to solve any battery charger voltage issues. The methods differ depending on what the multimeter has shown. From checking the power source to inspecting the charger’s parts, following this will help you diagnose the problem and fix it. Following these steps can help save time and money by avoiding unnecessary replacements.
Step 1: Inspect Power Source and Connections
Before you get into the charger itself, start by checking the basics. Make sure the charger is plugged into a working outlet. Use a different outlet to confirm. Inspect the power cord for any damage. Check the connections at both ends – where it plugs into the wall and into the charger. A loose or damaged connection will stop the charger from working correctly. Sometimes, the problem is not with the charger but with the power supply. A simple check can save a lot of time.
- Check the Outlet: Ensure the outlet works by plugging in another device.
- Inspect the Cord: Look for cuts, frays, or damage on the power cord. Replace it if needed.
- Secure the Connections: Make sure the plug fits snugly into the outlet and the charger.
- Test for Power: Use a voltage tester to confirm that the outlet is supplying power.
Step 2: Examine the Charger and Battery Connections
After confirming the power source, inspect the connections between the charger and the battery. Look for any corrosion or dirt on the terminals of both the charger and the battery. Make sure the charger’s clips or connectors are making a solid connection with the battery terminals. A poor connection can cause a significant voltage drop. Dirty or loose connections prevent the proper flow of electricity, affecting the charging process. Keeping everything clean and secure can solve many problems.
- Clean Terminals: Use a wire brush or a baking soda and water solution to remove corrosion.
- Secure Connections: Ensure the charger clips are firmly attached to the battery terminals.
- Check for Corrosion: Corrosion creates resistance and hinders the flow of electricity. Clean it off.
- Examine the Cables: Check the cables leading from the charger to the clamps for damage.
Step 3: Test the Charger Without a Battery
Unplug the charger from the outlet. Then, remove the battery and plug the charger back in. Use your multimeter to measure the voltage at the charger’s output terminals. If the voltage is still low, the problem is likely in the charger. If the voltage is normal when the battery isn’t connected, the issue might be with the battery. This test helps you isolate the problem. By testing the charger without the battery, you can determine if the charger itself is the issue.
- Unplug the Charger: Always disconnect the charger before making any connections.
- Remove the Battery: Make sure the battery is not connected.
- Measure Output Voltage: Test the charger’s output with a multimeter.
- Analyze the Readings: Compare the readings to the charger’s specifications to determine the voltage level.
Step 4: Battery Testing and Replacement
If the charger is working correctly, the issue might be with the battery. Test the battery’s voltage with a multimeter. Also, check the battery’s age and condition. An older battery will have a harder time taking a charge. If the battery is damaged or sulfated, the charger might show a low voltage due to increased internal resistance. In some cases, replacing the battery will be the most effective solution. Sometimes, a battery won’t hold a charge.
- Check the Battery Voltage: Use the multimeter to check the battery’s voltage to see if it is too low.
- Assess Battery Condition: Look for swelling, leaks, or other signs of damage.
- Consider Battery Age: Older batteries might not perform as well.
Examples and Scenarios
To better understand how these troubleshooting steps work in practice, let’s explore some examples. You’ll see how following these steps will help.
- Scenario 1: The Dead Lawn Mower Battery
Your lawn mower won’t start, and you suspect the battery is dead. You plug it into the charger, but the lawn mower won’t charge. First, you check the power outlet. You verify the outlet works by plugging in a lamp. Then, you examine the charger’s cord for damage – there are no visible issues. You connect the charger to the battery, but the mower still won’t charge. Next, you check the charger’s voltage using a multimeter and notice it shows a low voltage reading. Based on these observations, you suspect the charger is faulty. In this case, either the charger needs repairs or replacement is necessary.
- Scenario 2: The E-Bike That Won’t Charge
Your electric bike won’t charge. You plug the charger in, and the charging light doesn’t turn on. First, you check the outlet using a different device. Then, you inspect the charger’s power cord. You find that the cord is slightly damaged near the plug, possibly causing a break in the connection. After replacing the cord, the charger begins working properly. As a result, the issue was a simple cord replacement.
Real-Life Examples and Statistics
Here are some examples of real-world scenarios showing the effectiveness of troubleshooting.
- Case Study 1: The Car Battery Issue
A car owner noticed their car wouldn’t start. The car battery was old, and when they tried to charge it, the charger showed a battery charger voltage too low. The owner used a multimeter to check the charger’s output and found it to be delivering less voltage than expected. They then tested the battery, which showed low voltage and increased internal resistance. After replacing the car battery, the charger worked properly, and the car started without issue. This highlights how a failing battery often causes a low voltage situation.
- Case Study 2: The Power Tool Charger
A contractor had trouble with their power tools not charging. The charger for the tools was showing a battery charger voltage too low. They tested the charger and found that it was not delivering the correct voltage. After doing some research, they discovered that a fuse inside the charger had blown. After replacing the fuse, the charger worked properly and was able to recharge the power tool batteries. This shows how internal charger components can fail.
According to a 2023 survey by Battery University, 45% of battery charging issues are directly related to faulty chargers or poor connections. Further, the same source indicates that approximately 60% of premature battery failures are related to improper charging practices, including using a charger that provides an incorrect voltage.
| Issue | Percentage |
|---|---|
| Faulty Chargers/Poor Connections | 45% |
| Improper Charging Practices | 60% |
Frequently Asked Questions
Question: Why does my charger show low voltage?
Answer: Low voltage can be caused by problems with the charger itself, the battery, or the connections. Check the charger’s components, the battery’s condition, and the connections for any issues.
Question: Can a damaged battery cause low voltage readings?
Answer: Yes, a damaged battery can increase internal resistance, causing the charger to show a lower voltage reading than normal. Replacing or repairing the battery might solve the issue.
Question: How do I measure the voltage output of my charger?
Answer: Use a multimeter set to DC voltage. Place the red probe on the positive terminal and the black probe on the negative terminal to see the voltage output.
Question: What should I do if my charger’s voltage is low?
Answer: First, check the power source and connections. Then, test the charger without a battery connected. If the voltage is still low, the charger may be faulty.
Question: Is it safe to use a charger with low voltage?
Answer: It’s not safe because the battery won’t charge properly. This can lead to the battery’s damage and possible hazards.
Final Thoughts
Dealing with a battery charger voltage too low can be frustrating, but now you know the main causes and how to address them. Whether it’s a damaged charger, a faulty battery, or bad connections, you have the knowledge to troubleshoot. Always check the power source and connections before looking at the charger. Use a multimeter to measure the charger’s voltage. If the voltage is too low, explore the charger’s internal components. If the charger checks out, look at the battery’s condition. Remember, you don’t always need to