Alternator Overcharging Battery Causes and Simple Fixes
Dealing with an alternator overcharging battery can be tricky, especially if you’re new to car maintenance. It’s a common issue that often confuses beginners because the electrical system can seem like a black box. But don’t worry! This post will walk you through the basics and provide a straightforward, step-by-step approach to diagnosing and resolving this problem. We’ll explore the causes and how to get your car back on the road safely. Let’s get started and unravel the mysteries of your car’s charging system.
What Causes an Alternator to Overcharge a Battery?
The alternator is the heart of your car’s electrical system, generating power to run all the electronics and recharge the battery. When it overcharges the battery, it’s like giving it too much food. This excess electricity can damage the battery and other electrical components. Several factors can lead to this issue. The voltage regulator, a small but important part of the alternator, is often the culprit. It’s responsible for controlling the voltage output. Other things like bad wiring, or even a faulty battery can also contribute to the problem. Let’s explore these causes in more detail.
Faulty Voltage Regulator: The Primary Culprit
The voltage regulator is a vital component within the alternator. Its main job is to monitor the voltage level of the car’s electrical system. It then tells the alternator how much electricity to produce. If the voltage regulator malfunctions, it might allow the alternator to send too much current to the battery. This leads to overcharging. This can happen due to age, wear, or even extreme temperatures. When the regulator fails, the battery receives more power than it can handle. This can result in battery damage, component failure, and even potential safety hazards. It’s like pouring too much water into a glass – it spills over and creates a mess.
- Internal Regulator Failure: Modern alternators often integrate the voltage regulator inside the unit. If the regulator goes bad, the alternator’s output can spike. This causes overcharging and leads to battery damage, along with other electrical problems. Replacing the entire alternator might be necessary in this scenario.
- External Regulator Issues: Some older vehicles use an external voltage regulator. If this regulator malfunctions, it can provide improper voltage control. This can lead to overcharging or undercharging of the battery. Replacing the external regulator is usually a straightforward repair.
- Overheating: Heat can damage the voltage regulator, regardless of its location. This is especially true in environments with extreme temperatures. High temperatures can cause the regulator’s components to degrade. This leads to incorrect voltage control and battery overcharging.
Wiring Problems and Connections
Faulty wiring can significantly affect the charging system. Corroded or loose wires can create increased resistance. This throws off the voltage readings and potentially leads to the alternator overcharging the battery. It is like a clogged pipe limiting water flow, but in this case, the electrical current flow is affected. A damaged wire might short out against the car’s chassis. This creates a direct path for the current, again messing up the charging. Furthermore, bad connections at the battery terminals or the alternator itself also increase the resistance. This interferes with the correct flow of electricity. Proper inspection of the wiring is crucial to finding and solving the problems.
- Corrosion at Terminals: Battery terminals are exposed to the elements, and corrosion can build up. This increases resistance and disrupts the flow of current. Over time, the charging system will malfunction. This leads to either undercharging or overcharging the battery. Clean the terminals regularly with a wire brush or a specialized cleaner.
- Loose Wires and Connectors: Vibrations from driving can loosen wires and connectors. Loose connections result in increased resistance and fluctuating voltage levels. These fluctuations can trigger the overcharging of the battery. Ensure that all connections are secure. Replace any damaged wires or connectors.
- Short Circuits: A short circuit occurs when a wire touches a metal part of the car’s body. This creates an unintended path for the electricity. The result is overcharging and potentially damage to the battery. Check the wiring for any signs of damage or wear.
Battery Problems: A Contributing Factor
While the alternator is usually the cause of overcharging, a faulty battery can also play a role. A failing battery might not be able to accept a charge properly. As a result, the alternator might try to keep pumping more current into it. This leads to overcharging. Furthermore, an internal short circuit within the battery will increase the voltage. This makes it look like the battery needs more electricity. This leads the alternator to overcharge and potentially damage the battery. Think of it like trying to fill a leaky bucket – the water (electricity) just keeps flowing to compensate. It’s important to keep an eye on your battery’s health.
- Internal Battery Shorts: Internal shorts can occur within the battery cells. This causes them to draw excessive current from the alternator. This leads the alternator to overcharge. These shorts can also produce a false reading that the battery is discharged.
- Battery Age and Condition: An old or damaged battery has a higher internal resistance. This can make it difficult for the battery to accept and retain a charge. As a result, the alternator might try to overcharge the battery.
- Sulfation: Sulfation occurs when lead sulfate crystals build up on the battery plates. This restricts the battery’s ability to accept a charge. This results in the alternator working harder and potentially overcharging the battery. Proper charging and maintenance are crucial to prevent sulfation.
Identifying the Signs of Alternator Overcharging
Recognizing the signs of an alternator overcharging battery early on can save you a lot of hassle and money. There are several clear indicators to watch out for. These include things like a flickering or overly bright light on the dashboard. You may also notice a distinct smell or the battery itself might look like it’s in trouble. Knowing these symptoms helps you take action before more serious damage occurs. It’s important to pay attention to these warning signals, as they are your car’s way of communicating a problem.
Dashboard Warning Lights and Indicators
Your car’s dashboard is equipped with several lights that can tell you about a problem in your vehicle. When the alternator overcharges, these lights will display. One of the most obvious signs is the battery light, which looks like a battery. If it stays lit up while the car is running, it could indicate an issue with the charging system. It might also flicker or become brighter than usual. Other lights, such as the ABS light or the check engine light, could illuminate. This is because the overvoltage affects other electronic components. They can also indicate electrical problems in the car. Paying attention to these warning lights can help you detect the issue quickly.
- Battery Light Illuminates: This is a clear indicator of a charging system problem. If the battery light stays on while the engine is running, your battery isn’t getting charged. If the light flickers, it’s also a sign of trouble. It could be an overcharging alternator or a failing voltage regulator.
- Dim or Overly Bright Headlights: Overcharging can cause your headlights to become brighter than usual. Conversely, if your charging system is having issues, your headlights may start to dim. This fluctuation in headlight brightness is a telltale sign.
- Check Engine Light: The check engine light will illuminate for various reasons. One of them is a problem with the car’s electrical system. This could happen if the alternator is sending too much voltage. Scanning the car with a diagnostic tool will help determine the exact cause of the problem.
Physical Signs of a Problem
Besides dashboard lights, there are physical signs. You can often see, smell, or even hear, which indicate that the alternator is overcharging the battery. One of the most common signs is the smell of rotten eggs. This smell is from hydrogen sulfide gas, released when the battery overcharges. You might also notice the battery casing bulging or even leaking. The car battery may be hot to the touch. These are all signs the battery is taking on more electricity than it can handle. Furthermore, you might hear a hissing or gurgling sound coming from the battery. These are critical signs.
- Battery Smell: If you detect a strong smell of rotten eggs near your car, this is usually a sign of an overcharged battery. This odor comes from hydrogen sulfide gas, which the battery releases when it’s overcharged.
- Battery Bulging: An overcharged battery may start to bulge or swell. This is because excessive internal pressure builds up. This is a very dangerous situation, as the battery may rupture or explode.
- Battery Leakage: Overcharging can lead to battery acid leakage. Battery acid is corrosive and can damage nearby components. This poses a safety hazard.
Performance Problems and Electrical Issues
Overcharging can cause a range of performance problems and impact your car’s electrical systems. For example, you may experience erratic behavior from electronic components. This might include the radio, power windows, or even the engine’s control unit. The excessive voltage can damage these sensitive systems. This might lead to malfunctions or complete failure. You might also notice issues with starting the car. The overcharged battery might be holding too much electricity. This can disrupt the engine’s normal starting process. Recognizing these symptoms helps you diagnose the problem.
- Erratic Electrical Behavior: Your car’s electrical components might behave erratically. The power windows could roll up and down slowly, or the radio might cut out unexpectedly. The overvoltage can negatively affect sensitive electronics.
- Starting Problems: An overcharged battery might not be able to provide the necessary power. This can lead to slow cranking or a complete failure to start the engine. This is because the overcharging could damage or weaken the battery.
- Failing Electronic Components: Overcharging can damage the electronic components of the vehicle. Items like the car’s computer, sensors, and other modules can become inoperative. If they get damaged, you’ll have to get them replaced.
Testing and Diagnostics: Finding the Problem
Once you suspect an alternator overcharging battery, the next step is to diagnose the issue. There are several tests you can do to identify the problem. You can start with basic voltage checks using a multimeter. This is to determine if the alternator is sending too much current to the battery. You can also inspect the wiring for any damage. For more detailed diagnostics, you can use a load test. This can show how well your battery can hold a charge. Troubleshooting these issues helps you pinpoint the cause of the problem.
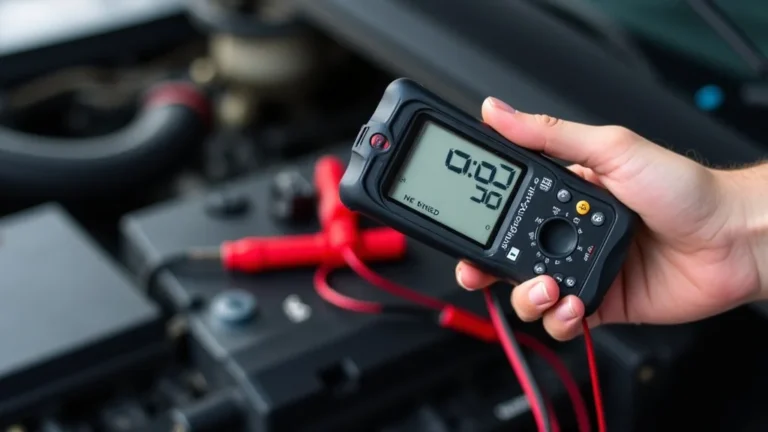
Using a Multimeter to Check Voltage
A multimeter is your best friend when it comes to electrical diagnostics. You can check the voltage output of your alternator and the state of your battery. Set the multimeter to DC voltage mode, select a range higher than 20 volts. Start the engine and connect the multimeter probes to the battery terminals. The reading on the multimeter should be around 13.5 to 14.5 volts. This indicates the alternator is charging the battery correctly. If the reading is consistently above 15 volts, this is a clear sign that the alternator is overcharging. It’s a simple test that can give you a quick answer.
- Battery Voltage Test (Engine Off): Measure the voltage across the battery terminals when the engine is off. A healthy battery should read around 12.6 volts. This tells you if the battery has enough charge before you even start the car.
- Alternator Output Test (Engine Running): With the engine running, check the voltage again. You should see a reading between 13.5 and 14.5 volts. This is a sign that the alternator is working properly and charging the battery correctly.
- Load Test (With Lights On): Turn on the headlights and other electrical devices. This increases the load on the alternator. The voltage should remain relatively stable. If the voltage drops dramatically, it might be a sign of alternator problems.
Inspecting Wiring and Connections
Wiring problems and loose connections are often the root of overcharging issues. Inspecting the wiring harness and connectors is a good step. This helps you identify any visible issues. Check for corrosion on battery terminals and alternator connections. Clean the terminals with a wire brush or specialized cleaner to ensure proper contact. Examine the wires for any signs of damage. This includes cracks, fraying, or burns. Ensure all connections are secure.
- Battery Terminal Inspection: Examine the battery terminals for corrosion. This is a white or greenish buildup that can increase resistance. Clean the terminals with a wire brush. You might also use a battery terminal cleaner.
- Alternator Connection Check: Inspect the connections at the alternator. This includes the main output wire. Ensure they are secure and free of corrosion. A loose or corroded connection can cause voltage fluctuations.
- Wiring Harness Examination: Trace the wiring harness from the alternator to the battery. Check for any signs of damage like cuts, fraying, or burns. Replace any damaged wires to eliminate potential short circuits.
Load Testing the Battery
A load test assesses a battery’s ability to deliver current under a simulated load. This reveals how well the battery is holding a charge. Professional automotive stores often do this test for free. A load tester applies a load to the battery. This allows you to evaluate its performance. The voltage is monitored during the test to see how well it maintains power. A failing battery will show a significant voltage drop under load. This can cause the alternator to overcompensate when charging. The load test helps identify a bad battery. It ensures that the alternator isn’t the only problem.
- Professional Load Test: Visit an auto parts store or a mechanic for a professional load test. They’ll have specialized equipment that can accurately test your battery.
- Battery Capacity Test: This test measures the battery’s ability to store and release energy. This will determine if the battery is capable of handling the electrical load.
- Results Interpretation: The results of the load test will tell you the battery’s condition. If the battery fails the test, it needs to be
Simple Steps to Fix Overcharging Issues
Addressing an alternator overcharging battery often involves a few key steps. These range from simple checks to actual component
Cleaning and Securing Connections
Cleaning and securing the electrical connections is usually the first step in addressing overcharging issues. Start by disconnecting the battery terminals. Then, use a wire brush or battery terminal cleaner to remove corrosion from the terminals and connectors. Ensure that all wires and connectors are securely connected. Check for any loose or damaged wires. Securely tighten all connections. Apply a protective coating like battery terminal protectant to prevent corrosion. These simple steps can solve many charging problems. They ensure efficient power flow and prevent voltage fluctuations. This keeps the charging system operating correctly.
- Disconnect the Battery: Before starting any electrical work, disconnect the negative battery terminal. Then, disconnect the positive terminal. This prevents any shorts.
- Clean Battery Terminals: Use a wire brush or a specialized cleaner to scrub away corrosion. Ensure the terminals are clean and shiny for optimal contact.
- Secure Connections: Tighten all connections at the battery terminals, the alternator, and any other relevant points. This ensures a solid electrical contact.
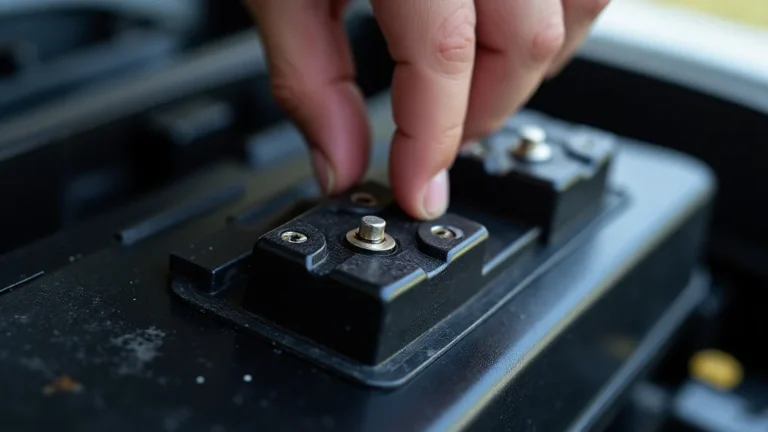
Replacing the Voltage Regulator
The voltage regulator is a component. If it’s the root of the overcharging problem, replacing it is necessary. If your alternator has a built-in regulator, you might have to
- Locate the Voltage Regulator: Identify the location of the voltage regulator. The regulator may be part of the alternator or a separate unit. Consult your car’s manual if needed.
- Disconnect and Remove: Disconnect the wiring from the voltage regulator. Then, remove the old regulator according to the manufacturer’s instructions.
- Install the New Regulator: Install the new voltage regulator. Then, reconnect the wiring, ensuring a secure connection. Reconnect the battery and test.
Battery Replacement if Necessary
If your battery has been damaged by overcharging, it might need to be
- Testing the Battery: Before replacing the battery, confirm it’s faulty. Perform a load test and check for any physical signs of damage.
- Selecting the Right Replacement: Choose a new battery that matches the specifications of your original battery. Consider the cold-cranking amps (CCA) rating.
- Installing the New Battery: Disconnect the old battery and carefully install the new one. Ensure the terminals are clean and securely connected.
Frequently Asked Questions
Question: What is the main cause of alternator overcharging?
Answer: The most common cause is a faulty voltage regulator within the alternator. This regulator controls the voltage output and, when broken, can cause the alternator to send too much power to the battery.
Question: Can a bad battery cause an alternator to overcharge?
Answer: Yes, a bad battery can contribute to overcharging. A failing battery might not accept a charge correctly, causing the alternator to continuously send current, resulting in overcharging.
Question: What tools do I need to diagnose an overcharging issue?
Answer: You will need a multimeter, a wire brush or battery terminal cleaner, and possibly a load tester if you wish to have a professional test your battery.
Question: How do I test if my alternator is overcharging?
Answer: Use a multimeter to measure the voltage across the battery terminals while the engine is running. The reading should be between 13.5 and 14.5 volts. Readings higher than 15 volts indicate overcharging.
Question: What should I do if my battery is overcharging?
Answer: First, check the voltage output with a multimeter. Then, inspect the wiring and connections. Next, you may want to replace the voltage regulator or the entire alternator, if needed. Replace the battery if it is damaged.
Final Thoughts
Addressing an alternator overcharging battery doesn’t have to be a complicated task. By exploring the likely causes, identifying the telltale signs, and following a step-by-step diagnostic and repair process, you can get your car’s charging system back on track. Remember, the key is to be systematic. Start with simple checks and gradually move to more advanced troubleshooting techniques. With a bit of patience and some basic tools, you can resolve the issue. If you’re unsure about any step, always seek help from a qualified mechanic. Taking the right actions can help protect your vehicle. Keep your car running smoothly and avoid bigger problems. Feel confident in tackling the problem. You got this!