Car Alternator Low Voltage: Simple Steps to Solve the Problem
Dealing with car alternator low voltage can be a headache, especially if you’re new to car maintenance. It’s a common issue because many different things can cause it, from simple battery problems to more complex electrical issues. Don’t worry, though! This isn’t as hard as it might seem. We’re going to break down the problem and show you how to find a fix. You’ll learn what causes it, how to check for it, and what to do if you find it. So, let’s get started!
What Causes Car Alternator Low Voltage?
The car alternator is responsible for keeping your car’s electrical system running smoothly and charging the battery. When the voltage from the alternator drops below the ideal level, it leads to several problems. Low voltage can happen because of a few different things. It might be a simple issue, or it could be a sign of a larger problem. It is important to know the reason for it to solve the issue. Let’s explore some of the frequent causes of this common problem and see how these issues affect your car.
Faulty Alternator Diodes
Alternator diodes are one-way valves for electricity, ensuring current flows in the correct direction. They convert the alternating current (AC) produced by the alternator into direct current (DC) that your car needs. If these diodes fail, the AC might leak out or not convert properly, leading to reduced voltage output. This is a typical electrical issue affecting your alternator’s performance. The alternator may not charge the battery sufficiently, causing low voltage issues. They can also overheat and fail. This can lead to a drop in voltage output, leaving your battery without proper charging. Without properly functioning diodes, the alternator will not deliver the correct voltage to your battery and other components.
- What Are Diodes?: Diodes are small electronic components that control the flow of electricity, letting it pass in only one direction. This is like a one-way street for electricity.
- Impact on Charging: When diodes are bad, the alternator can’t fully charge the battery. This can result in a slow start or other electrical problems.
- Symptoms of Failure: Signs of bad diodes include dimming lights, slow cranking, and a battery that keeps dying.
A diode is essentially a semiconductor device that allows current to flow in one direction while blocking it in the other. Diodes are usually made of silicon. Their primary function is to rectify AC current to DC. They play a significant role in modern electronics. A common failure mode for diodes is that they can short circuit, resulting in complete failure to rectify or conduct. This can cause alternator low voltage symptoms. Another mode is when the diode partially fails. In this case, it might leak and reduce the alternator output voltage. These failures reduce the charging capability of the alternator.
Loose or Corroded Connections
Electrical connections in your car can become loose or corroded over time. This includes the wires that connect to your alternator, battery, and other electrical components. Corrosion, the result of a chemical reaction, builds up over time. It creates resistance to current flow, meaning the electrical energy isn’t flowing freely. Loose connections also create resistance. This means there might be a disruption in the flow of electricity. This disruption can cause a drop in voltage. Regular maintenance, such as checking and cleaning these connections, is necessary to avoid these problems.
- Importance of Connections: Good connections are vital for electricity to flow from the alternator to the battery.
- What Causes Corrosion?: Moisture, salt, and other environmental factors can cause corrosion. This will impact the performance of your vehicle.
- How to Check Connections: Look for rust, loose wires, and damage at the terminals.
Corrosion can occur at any electrical connection point. This includes battery terminals, alternator terminals, and the wiring harness connectors. Corrosion increases resistance, reducing voltage and current flow. Loose connections also suffer from increased resistance, leading to voltage drops and heat buildup. Over time, heat and electrical discharge can worsen the corrosion and weaken the connection. If you have any questions, you should consult a professional mechanic. They can inspect, clean, and secure your connections for optimal electrical performance. You should always ensure that you disconnect the negative terminal on your battery before working on any electrical connections.
Worn or Damaged Alternator Brushes
The alternator brushes are small pieces of carbon that contact the rotating part of the alternator. These brushes deliver electrical current to the rotor to create a magnetic field. Over time, the brushes wear down, losing contact with the rotor. This impacts the generation of electricity. This will lead to car alternator low voltage issues. Regular inspection and replacement of these brushes are essential for maintaining proper charging. Replacement brushes are inexpensive. However, these are often overlooked.
- Function of Brushes: Brushes transfer electricity to the spinning rotor, making the alternator work.
- Signs of Wear: Symptoms include a dim light and charging issues.
- Replacing Brushes: You’ll need to open the alternator. This can be tricky. It’s often best to let a mechanic handle this.
The brushes in an alternator slide against the slip rings on the rotor. They enable the transfer of current to the rotor windings. As the rotor turns, the brushes wear away. This is caused by friction. The worn-out brushes may lose contact with the slip rings. This can lead to low voltage output. The rate of wear depends on the use of your car and driving conditions. Typically, brushes should be inspected every 50,000 to 100,000 miles. A worn-out brush can cause voltage fluctuations, which in turn can damage other car parts. Regular alternator maintenance, including brush replacement, can extend the life of your alternator.
Testing for Car Alternator Low Voltage
To diagnose car alternator low voltage, you need to use specific tools and procedures. The correct diagnosis is critical to ensure proper function and resolve the voltage issues. These tests will help you pinpoint the issue and take appropriate steps. By performing these tests, you can accurately identify the root cause of the problem. This can help you decide if you need a replacement or if a simpler solution will fix the issue. A multimeter is a useful tool. This tool measures voltage and checks the battery and alternator.
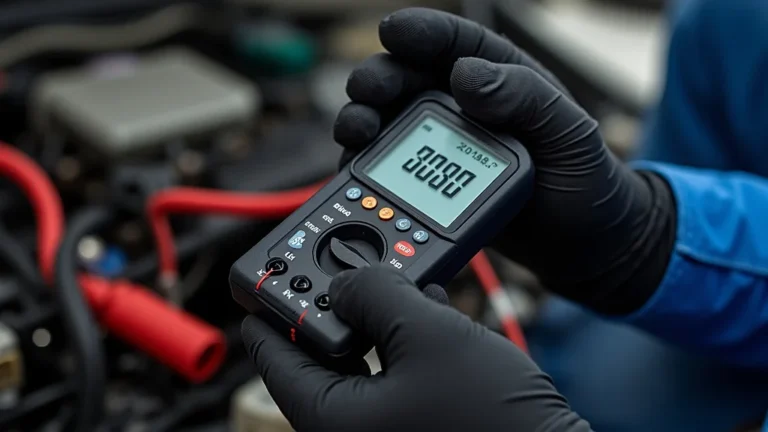
Using a Multimeter to Check Voltage
A multimeter is your best friend when it comes to checking the voltage. It’s a simple tool that helps you diagnose electrical problems. You’ll use it to measure the voltage of your battery and alternator to ensure everything works as it should. There are different types of multimeters, but all work on the same basic principle. They measure voltage, current, and resistance. You will need to know which settings to use for voltage checks. Follow these steps to correctly use a multimeter. Check the battery voltage before starting the engine, and then measure the voltage while the engine is running.
- Setting Up the Multimeter: Set your multimeter to the DC voltage setting. This is usually marked with a “V” with a straight line and a dashed line above it.
- Battery Voltage Test: Touch the red probe to the positive (+) terminal of the battery and the black probe to the negative (-) terminal.
- Alternator Voltage Test: Start the car and let it run. Then, repeat the test. You should see a higher reading.
Before you start, make sure your multimeter is properly set up for DC voltage measurement. Select the appropriate voltage range on the dial (usually 20V DC is good). Connect the red probe to the positive (+) terminal of your battery and the black probe to the negative (-) terminal. If the voltage is low, then the battery is losing power. Now, start your engine. With the engine running, measure the voltage again. You should see a higher voltage, typically between 13.5 to 14.5 volts. This indicates that the alternator is charging the battery. If you find low voltage, it suggests a problem with the alternator or related wiring. You can also test the voltage at the alternator output terminal directly. This might help to isolate the problem.
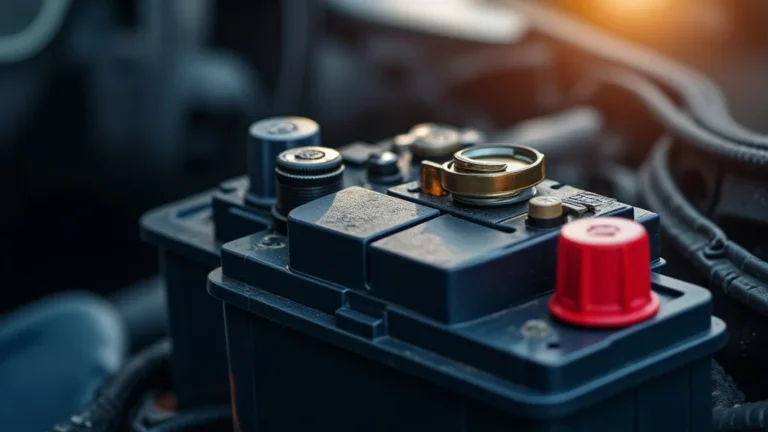
Inspecting the Battery and Connections
Visual inspection is the next step. Sometimes, the problems are easy to spot. This part involves looking at the battery and all the connections. Start by checking the battery terminals for corrosion, which looks like a white or green buildup. This can prevent electricity from flowing. Next, check the wires connected to the battery and the alternator. Make sure they are secure. Look for any fraying or damage that might cause issues. Tightening or cleaning can solve the problem.
- Checking Terminals: Look for any corrosion on the battery terminals.
- Inspecting Wires: Check the wires connecting to the battery and the alternator for damage.
- Cleaning Connections: Clean the terminals using a wire brush and baking soda solution.
To inspect your battery and connections, first visually inspect the battery terminals. Look for corrosion (white or greenish buildup) or any signs of damage. Any corrosion must be removed for efficient charging. Next, check the battery terminals for cleanliness. Use a battery terminal cleaner or a solution of baking soda and water to remove any buildup. Ensure that the terminals are free from any debris. Also, inspect the cables connecting to the terminals, searching for any fraying or damage. Tighten any loose connections. Finally, inspect the connections at the alternator. These checks can show issues that may be causing voltage problems.
Simple Solutions for Car Alternator Low Voltage
You can often fix car alternator low voltage with some simple steps. Before you rush to
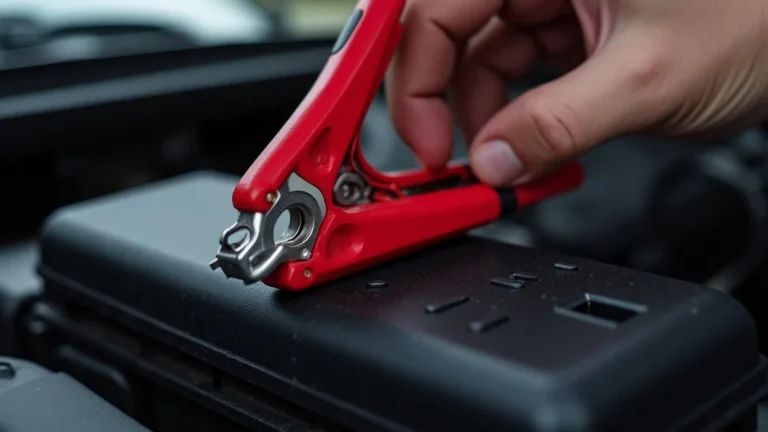
Cleaning Battery Terminals and Connections
Cleaning battery terminals and connections is a great place to start. A dirty connection can stop electricity from flowing properly. You’ll need a few supplies: a wire brush (or a terminal cleaner brush), baking soda, water, and gloves. First, disconnect the negative (black) cable from the battery. Then, disconnect the positive (red) cable. Mix baking soda with water to make a paste. Use the brush to scrub the terminals and cable connectors. This should remove any corrosion or dirt. Rinse everything with clean water, and dry it. Reconnect the cables in reverse order. Finally, tighten the terminals to ensure a good connection.
- Gather Supplies: You’ll need gloves, a wire brush, baking soda, and water.
- Disconnect Cables: Start by removing the negative cable first.
- Clean the Terminals: Use the brush and baking soda paste to scrub away corrosion.
The process of cleaning battery terminals is a straightforward task. However, you should do it carefully. Start by disconnecting the negative terminal of the battery. This helps to prevent any sparks and potential short circuits. Next, remove the positive terminal. Use the wire brush to scrub away corrosion and buildup on the terminals. If there is significant corrosion, a mixture of baking soda and water can help. Apply the paste to the terminals and let it sit for a few minutes. Then, scrub with the wire brush. Once the terminals are clean, rinse them with water. Allow the terminals to dry completely before reconnecting. Reconnect the positive terminal and then the negative terminal. Make sure you tighten the terminals to ensure a solid connection.
Checking and Replacing the Battery
Sometimes, a low battery is the problem. Your battery may not be holding a charge. In this case, you will have to check the battery. You should use a multimeter to check the voltage. If the voltage is low, try charging the battery. If the battery does not hold a charge, it is time to replace it. A good battery is vital for a smooth operation. Make sure to choose a battery that fits your car model and has the correct specifications. When you’re replacing the battery, be sure to clean the terminals and connections as described earlier. This ensures a good connection. Replacing the battery is a relatively easy fix if the old battery is the issue.
- Testing the Battery: Use a multimeter to measure the battery voltage when the engine is off.
- Charging the Battery: Try charging the battery with a charger. See if it holds a charge.
- Choosing a New Battery: Make sure you pick the right size and type for your car.
Checking the battery involves a few steps to ensure it is working correctly. First, use a multimeter to check the voltage of the battery when the engine is off. A fully charged battery should read around 12.6 volts. If the reading is below 12 volts, the battery may need charging or replacement. Next, connect the battery to a charger and fully charge it. If the battery does not hold a charge, it’s likely failing and requires replacement. When selecting a new battery, consider your car’s make and model. This ensures a proper fit and sufficient power. Ensure the battery has the correct cold-cranking amps (CCA) rating to match your vehicle’s requirements. Replace the battery following the safety instructions. Check the date stamp on the battery. This indicates its production date. A new battery is essential to maintain a reliable electrical system.
When to Seek Professional Help
Sometimes, the problem is more complicated than simple fixes can handle. If the car alternator low voltage issues continue after trying these steps, it’s time to bring in the experts. A mechanic has the tools and expertise to identify complex problems. They can diagnose the issue. Do not attempt to fix these yourself unless you have the right training. A professional can quickly diagnose and fix the issue. This saves you time and also prevents further damage to your car. This ensures safety and also gets your car back on the road in top shape.
Advanced Diagnostic Tools
A professional mechanic has access to advanced diagnostic tools that can pinpoint the exact cause of the problem. These tools include sophisticated scanners and multimeters. They can test the alternator and related electrical components. They can also use oscilloscopes to analyze the electrical signal patterns. This can identify issues such as diode failure, or worn brushes. These are problems that are not as easy to see with a visual check. These tools help them accurately identify the issue. This leads to an efficient solution. The equipment and knowledge of a mechanic are vital for resolving complex issues. This will ensure your car’s electrical system is working safely and correctly.
- Scanners: These can read codes from your car’s computer that might point to the problem.
- Oscilloscopes: These can show the electrical signals from the alternator.
- Specialized Multimeters: These are more precise than standard multimeters.
The use of advanced diagnostic tools is crucial for accurate and efficient problem-solving. Scan tools, for example, can read error codes from your car’s computer. This helps to pinpoint the source of electrical problems, such as alternator issues. Oscilloscopes provide detailed information about the electrical signals. This allows technicians to identify issues such as faulty diodes or irregular voltage patterns. Specialized multimeters, with higher accuracy and specific functions, enable precise voltage and current measurements. These tools help identify the root cause of car alternator low voltage problems. The advanced tools also help technicians evaluate the alternator output and the charging system’s overall performance. They help the mechanic make an informed decision for the repair or replacement of parts.
Complex Electrical Issues
Sometimes, car electrical problems are complex. This could involve issues with the wiring harness or other components. These issues require professional help. If you’ve tried all the simple fixes and the problem persists, you might have a wiring issue. It could be a short circuit or damage. This is difficult to diagnose without experience. A mechanic can properly check the wiring. This includes identifying shorts and other damage. They will use specialized tools to diagnose the problem. They will be able to restore your car’s electrical function. You can trust their experience to diagnose and fix such problems. You can avoid further damage to your car.
- Wiring Problems: These can include short circuits or damaged wiring.
- Other Components: Problems can involve the car’s computer or other electrical parts.
- Professional Expertise: Mechanics are trained to find and fix these complex problems.
Complex electrical issues are difficult to diagnose and repair. The problems might involve damaged or corroded wiring. There could be internal failures within the alternator or other components of the electrical system. Wiring harnesses, the network of wires in your car, can suffer from damage due to wear and tear. This can result in shorts, open circuits, or voltage drops. Internal failures in the alternator, such as faulty voltage regulators or damaged stator windings, can also lead to low voltage. Diagnosing these issues requires specialized knowledge and tools. A mechanic has the skills to properly identify and resolve these problems. This can prevent further damage to the electrical system.
Frequently Asked Questions
Question: What does low voltage in a car mean?
Answer: Low voltage means the electrical system in your car isn’t getting enough power. This can affect things like lights, the radio, and the car’s ability to start.
Question: How do I know if my alternator is bad?
Answer: Some signs include dim headlights, a battery that keeps dying, and the car starting slowly. Using a multimeter to check the voltage can confirm alternator problems.
Question: Can I drive with car alternator low voltage?
Answer: You can drive, but it’s not a good idea. Low voltage will drain the battery and cause other electrical problems. This will leave you stranded.
Question: How often should I test my car’s alternator?
Answer: It’s good to check your alternator’s voltage at least once a year, or whenever you have electrical issues. You can do this at home with a multimeter.
Question: How much does it cost to fix car alternator low voltage?
Answer: The cost varies. Simple fixes like cleaning terminals might cost very little. A new alternator could cost several hundred dollars, including parts and labor.
Final Thoughts
Discovering that your car has car alternator low voltage can be unsettling, but remember it’s a common issue with solutions. You’ve now seen the basic causes of this problem. You can start by checking simple things like the battery terminals and connections. These are often easy fixes. Then, you can use a multimeter to check the voltage. If it’s not charging correctly, you may need a new alternator or have other electrical issues. If the issue is complex, you might need to seek a professional mechanic. By following these steps, you’re well-equipped to resolve the problem and keep your car running smoothly. Don’t wait—take action. This will keep your car reliable. You got this!