Easy Guide How to Charge a Car Battery at Home Safely
Featured image for how to charge a car battery at home
Image source: i.pinimg.com
Charging your car battery at home requires strict adherence to safety protocols. Always prioritize ventilation and personal protective equipment, connecting terminals correctly (positive to positive, negative to a ground point away from the battery) before selecting the appropriate charge mode. Monitor the process closely and disconnect safely once complete to ensure battery health and prevent accidents.
Life can throw unexpected curveballs, can’t it? Imagine this: You’re all set to head out, perhaps for work, groceries, or a fun weekend trip. You hop into your car, turn the key, and… nothing. Just a sad, clicking sound or complete silence. Your heart sinks. You’ve got a dead car battery, and suddenly, your plans are on hold. It’s a frustrating moment we’ve all probably faced, feeling stranded and a little helpless.
In those moments, the immediate thought is often to call for roadside assistance or a friend for a jump start. While those are certainly options, wouldn’t it be empowering to know exactly how to handle the situation yourself? Learning how to charge a car battery at home safely is a valuable skill that not only saves you time and money but also gives you a deeper understanding of your vehicle. It’s simpler than you might think, and with the right knowledge and precautions, you can get your car back on the road without a hitch.
This guide is designed to walk you through the process, just like a friend explaining it step-by-step. We’ll cover everything from understanding why your battery might die to choosing the right equipment and, most importantly, ensuring you do it safely. So, let’s demystify the process of how to charge a car battery at home and turn that moment of frustration into a feeling of accomplishment!
Key Takeaways
- Always Prioritize Safety: Wear PPE and ensure excellent ventilation.
- Inspect Battery First: Check for damage, leaks, or cracks.
- Choose Correct Charger: Match charger settings to your battery type.
- Connect Correctly: Red to positive, black to negative or chassis.
- Charge Safely: Monitor progress; avoid overcharging or sparks.
- Disconnect Properly: Remove negative first, then positive.
📑 Table of Contents
- Why Your Car Battery Might Need a Charge (and Why DIY is Handy)
- Gathering Your Gear: What You’ll Need to Charge Your Car Battery at Home
- Safety First! Essential Precautions Before You Begin
- Step-by-Step Guide: How to Charge a Car Battery at Home
- Battery Maintenance Tips for a Longer Life (and Avoiding Future Dead Batteries)
- Conclusion
Why Your Car Battery Might Need a Charge (and Why DIY is Handy)
Before we dive into the “how-to,” let’s quickly understand the “why.” Knowing the common culprits behind a dead battery can help you prevent future occurrences and appreciate the value of being able to charge it yourself.
Common Causes of a Dead Battery
- Lights Left On: The most classic mistake! Dome lights, headlights, or even the trunk light can drain a battery surprisingly quickly if left on overnight.
- Extreme Temperatures: Both very cold and very hot weather can reduce a battery’s efficiency and lifespan, making it harder to hold a charge.
- Short Drives: Your alternator charges the battery while you drive. If you only take short trips, the alternator might not have enough time to fully recharge the battery.
- Old Battery: Car batteries typically last 3-5 years. As they age, their ability to hold a charge diminishes naturally.
- Parasitic Drains: Sometimes, electrical components in your car can draw a small amount of power even when the car is off, slowly draining the battery over time.
The Benefits of Knowing How to Charge Your Car Battery at Home
Beyond the immediate relief of getting your car started, there are several perks to mastering how to charge a car battery at home:
- Cost Savings: No need to call a tow truck or roadside assistance every time.
- Convenience: You can charge your battery on your own schedule, day or night.
- Self-Reliance: It’s incredibly empowering to fix a common car problem yourself.
- Better Battery Health: Regular, proper charging can extend your battery’s life, especially if it often experiences deep discharges.
Gathering Your Gear: What You’ll Need to Charge Your Car Battery at Home
Preparing with the right tools is half the battle. You don’t need a professional garage setup, but a few key items will make the process of how to charge a car battery at home safe and efficient.
Choosing the Right Battery Charger
This is your most important tool. There are a few types, but for home use, we highly recommend smart chargers.
- Smart Chargers (Automatic Chargers): These are fantastic for beginners. They monitor the battery’s charge level and automatically adjust the charging rate, preventing overcharging. Many also have modes for different battery types (like AGM or Gel) and can even act as a maintainer.
- Trickle Chargers: These deliver a low, continuous current, ideal for maintaining a battery over long periods (e.g., if you store a classic car or motorcycle for winter). They charge slowly and are generally safe against overcharging if left on.
- Manual Chargers: These require more attention as you set the charging rate and must manually disconnect them once the battery is full. We generally don’t recommend these for beginners due to the risk of overcharging.
When selecting a charger, also consider its amperage. A lower amperage (2-10 amps) charges slower but is gentler on the battery, while a higher amperage (10-20 amps) can charge faster but requires more care. For home use, a smart charger with multiple amperage settings (e.g., 2A for maintenance, 10A for charging) is often the best choice.
Essential Safety Equipment
Safety is paramount when working with car batteries!
- Safety Glasses: Battery acid can cause serious eye injury. Never skip this.
- Gloves: Protect your hands from acid and corrosion.
Other Handy Tools
- Wire Brush and Terminal Cleaner: For scrubbing away corrosion from battery terminals.
- Wrench or Socket Set: To loosen and tighten battery terminal clamps, if necessary.
- Baking Soda and Water Mix: A simple solution (about one tablespoon of baking soda per cup of water) can neutralize battery acid and clean corrosion.
- Rags or Old Towels: For cleaning and wiping spills.
Safety First! Essential Precautions Before You Begin
Before you even think about connecting anything, let’s talk safety. This section is crucial because car batteries, while commonplace, contain corrosive acid and can produce flammable gases. Knowing how to charge a car battery at home safely means respecting these risks.
Ventilation is Key
When a battery charges, it can release hydrogen gas, which is highly flammable. Always work in a well-ventilated area – ideally outdoors or in an open garage. Never charge a battery in an enclosed space without airflow.
Personal Protective Equipment (PPE)
As mentioned, your safety glasses and gloves are non-negotiable. Wear them throughout the entire process, from inspection to disconnection.
Disconnecting the Battery (Optional but Recommended for Some)
While many modern smart chargers allow you to charge the battery while it’s still connected to the car, some prefer to remove it entirely for safety or ease of access. If you choose to disconnect, always remove the negative (black) cable first, then the positive (red) cable. Reconnect in reverse: positive first, then negative. This minimizes the risk of accidental sparks.
Sparks and Flammables
Keep any sources of ignition – open flames, cigarettes, sparks – far away from the battery. The hydrogen gas produced during charging can ignite very easily. Ensure your charging area is free of any flammable materials.
Step-by-Step Guide: How to Charge a Car Battery at Home
Alright, you’ve got your gear, you understand the safety precautions, and you’re ready to learn the core steps of how to charge a car battery at home. Let’s do this!
Preparation and Inspection
- Locate and Inspect the Battery: Pop your hood and find your car battery. Check for any visible damage like cracks, leaks, or bulging. If you see significant damage, do not attempt to charge it; it might be beyond repair or unsafe.
- Clean the Battery Terminals: Corrosion (often a white or blue-green powdery substance) on the battery terminals can impede charging. Disconnect the terminals (negative first, then positive, if removing the battery) and use your wire brush and terminal cleaner to scrub away any corrosion. A baking soda and water paste works wonders too. Rinse with clean water and dry thoroughly.
- Check Electrolyte Levels (if applicable): Some older lead-acid batteries have removable caps. If yours does, carefully remove the caps and check the fluid level. If it’s low, add distilled water (not tap water!) until it covers the plates. Do not overfill.
Connecting the Charger
This is a critical step for safety and proper function.
- Connect the Positive Clamp: Attach the red (positive, usually marked with a “+”) clamp of the charger to the positive terminal of the battery.
- Connect the Negative Clamp: Attach the black (negative, usually marked with a “-“) clamp of the charger to the negative terminal of the battery.
- Important: If the battery is still in the car, and you’re worried about sparks near the battery, you can attach the negative clamp to a clean, unpainted metal part of the car’s chassis, away from the battery itself. This creates a good ground connection.
- Ensure Secure Connections: Wiggle the clamps slightly to make sure they have a firm grip. Loose connections can cause arcing.
Setting Up and Charging
- Plug in the Charger: ONLY plug the charger into the electrical outlet AFTER the clamps are securely attached to the battery. This prevents sparks near the battery terminals.
- Select Settings: If your charger has settings for battery type (e.g., standard lead-acid, AGM, Gel) or amperage (e.g., 2A, 10A), select the appropriate ones. For a deeply discharged battery, a higher amperage (10A) will charge faster, but a lower amperage (2-5A) is gentler if you have time.
- Monitor the Charging Process: Most smart chargers have indicator lights that show charging progress. They’ll typically switch to a “maintenance” or “charged” mode once complete. Charging time varies greatly depending on the battery’s size, discharge level, and charger’s amperage (could be a few hours to a full day).
Disconnecting the Charger Safely
Once the battery is fully charged (the charger indicates it’s done):
- Unplug the Charger: ALWAYS unplug the charger from the wall outlet FIRST.
- Remove the Negative Clamp: Disconnect the black (negative) clamp from the battery terminal (or car chassis).
- Remove the Positive Clamp: Disconnect the red (positive) clamp from the battery terminal.
- Reconnect Battery (if disconnected): If you removed the battery or disconnected its cables, reconnect them now: positive first, then negative. Make sure they are tight.
Congratulations! You’ve successfully learned how to charge a car battery at home.
Battery Maintenance Tips for a Longer Life (and Avoiding Future Dead Batteries)
Knowing how to charge a car battery at home is great, but even better is preventing it from dying in the first place! A little proactive maintenance can significantly extend your battery’s lifespan.
Regular Cleaning
Periodically inspect your battery for corrosion. Clean terminals as described in the charging steps. A clean battery performs better and lasts longer.
Checking Battery Terminals and Cables
Ensure the battery terminal clamps are tight and secure. Loose connections can lead to poor charging and starting issues. Also, check the cables themselves for any fraying or damage.
Proper Driving Habits
Try to avoid very short trips where the alternator doesn’t have time to fully recharge the battery. If you primarily make short drives, consider taking a longer drive (30 minutes or more) at highway speeds once a week to ensure your battery gets a good charge.
Monitoring Battery Age
Most car batteries last between 3 to 5 years. If your battery is approaching this age, it might be wise to have it tested by a professional, especially before winter. Replacing it proactively can save you from a dead battery emergency.
Consider a Trickle Charger for Storage
If you have a vehicle that sits unused for extended periods (weeks or months), a trickle charger or battery maintainer is a fantastic investment. It will keep the battery topped up, preventing it from discharging and extending its overall life.
Conclusion
Dealing with a dead car battery can feel daunting, but as you’ve seen, learning how to charge a car battery at home safely is a skill within everyone’s reach. By understanding the basics, gathering the right tools, and diligently following safety precautions, you can confidently tackle this common automotive issue yourself.
Remember, safety always comes first. Take your time, double-check your connections, and work in a well-ventilated area. With this guide, you’re not just fixing a problem; you’re gaining valuable knowledge and boosting your confidence as a car owner. So, the next time your car gives you that familiar “click,” you’ll know exactly what to do – and you’ll do it safely and effectively!
Frequently Asked Questions
What essential equipment do I need to safely charge a car battery at home?
You’ll need a car battery charger, safety glasses, and gloves. Ensure you’re in a well-ventilated area, away from sparks or open flames, to prevent the buildup of explosive hydrogen gas.
What are the basic steps to charge a car battery at home?
Begin by ensuring proper ventilation and wearing safety gear. Connect the positive (red) charger clamp to the positive (+) battery terminal, then the negative (black) clamp to the negative (-) battery terminal. Finally, plug in your charger and select the appropriate settings to begin to charge a car battery at home safely.
How long does it typically take to charge a car battery at home?
The charging time varies depending on the battery’s discharge level and the charger’s amperage. A deeply discharged battery could take 8-24 hours with a standard trickle charger, while a faster charger might complete the task in 2-6 hours. Always consult your charger’s manual for specific guidelines.
What type of charger should I use to safely charge a car battery at home?
It’s best to use an automatic “smart” charger or a “trickle” charger, especially for beginners. These chargers monitor the battery’s charge level and prevent overcharging, automatically switching to maintenance mode once full.
How do I know when my car battery is fully charged?
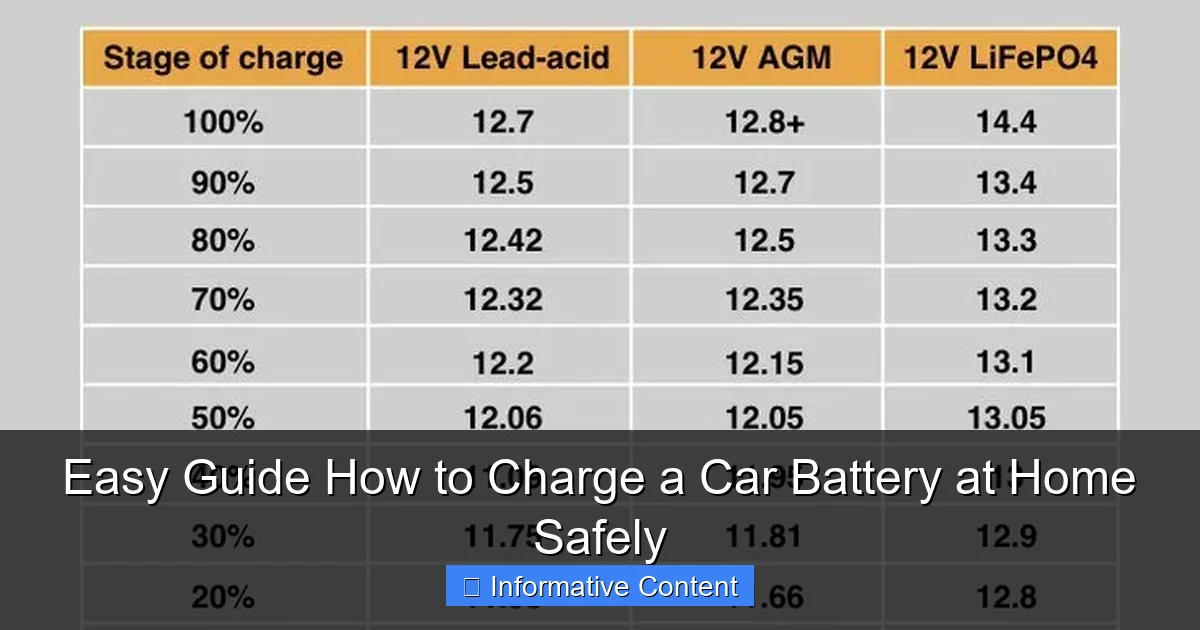
Most modern “smart” chargers have an indicator light that changes color or displays “Full” or “Charged” when the process is complete. If you’re using a basic charger, you can also test the voltage with a multimeter; a fully charged 12V battery should read around 12.6 to 12.8 volts.
Can I overcharge my car battery, and what are the risks?
Yes, overcharging can damage your battery by causing excessive gassing, which depletes electrolyte levels and can warp internal plates. Using a smart charger with an automatic shut-off or maintenance mode is crucial to prevent this and ensure safe charging at home.