Jump Starter Battery Replacement Simple Guide
Replacing the battery in your jump starter might seem tough, especially if you’re new to car maintenance. It can feel like a complex task. But don’t worry! This process is easier than you think. This guide will walk you through the steps. We’ll show you how to do a jump starter battery
What You Need Before Starting
Before you get started on your jump starter battery
Essential Tools and Materials
The right gear is key for any battery replacement. You need to ensure you have the proper tools for safety. Avoid damaging the jump starter or, worse, hurting yourself. Get these ready before you begin.
-
Screwdriver Set: You’ll need various sizes and types of screwdrivers. These will help you open the jump starter case. The sizes and types depend on the jump starter model. Often, you will need Phillips head and flathead screwdrivers.
A good screwdriver set includes a variety of sizes and types. This helps you to fit the screws on different jump starters. Without the right tools, you might strip the screws or damage the case.
-
Replacement Battery: You’ll need a new battery that matches the old one’s voltage and size. Check the label on your current battery. Get the same specifications. Then, choose a trusted brand for a reliable battery.
The replacement battery should match the original. The voltage must be the same to ensure your jump starter works correctly. Buying a high-quality battery gives you better performance. Additionally, you will reduce the likelihood of early failure.
-
Gloves: Wear gloves to protect your hands from battery acid. This is crucial for safety. Gloves help you maintain a good grip on tools. Gloves also reduce the risk of irritation.
Gloves are a must. Battery acid can burn your skin. Also, gloves help you handle the battery without leaving fingerprints. Pick gloves that fit well and allow you to work. Then you can protect your hands.
-
Safety Glasses: These protect your eyes from any splashes or debris. Battery work can create small particles. Safety glasses will keep them from harming you.
Always wear safety glasses when working around batteries. A stray spark or a splash of acid can cause damage to your eyes. Safety glasses are a simple but crucial safety measure.
Gathering these items before you start the project saves time. It also helps to prevent issues during the jump starter battery replacement process.
Opening Your Jump Starter and Removing the Old Battery
The first step in any jump starter battery replacement is to open the case. You must access the internal components. This requires care. The process is relatively simple, but attention to detail is essential. Improper handling of the components may cause damage.
Unscrewing the Case
Find the screws. They’re usually on the sides or back. Use the right screwdriver for the job. Then carefully unscrew the case. Put the screws in a safe place. Keep them together. Otherwise, you might lose them.
-
Locate the Screws: Carefully inspect the jump starter case. Look for screws on the edges or back. You might find them covered by stickers or rubber feet.
Identifying the screws is the first step. Look closely, as they might be hidden. Some cases have more screws than others. Some even have different screw types. So, prepare for this.
-
Choose the Correct Screwdriver: Using the wrong screwdriver can strip the screw heads. Select the one that fits perfectly. It’s often a Phillips head, but some might need a flathead.
Choose the right screwdriver to make the job easier. You prevent damage to the case. A good fit ensures you can apply the necessary force. That is without stripping the screw heads.
-
Unscrew the Case Carefully: Apply steady pressure. Turn the screwdriver slowly. Once the screw is loose, set it aside. Avoid forcing anything.
Unscrewing requires patience and care. Go slowly and steadily. Don’t force the screws, and if they feel stuck, stop. Try using a different screwdriver or applying some penetrating oil.
Once you’ve removed all screws, you can carefully separate the case halves. Be gentle, and don’t force anything. The plastic can break.
Disconnecting the Battery
After opening the case, you’ll see the battery connected to the jump starter’s internal components. This requires careful disconnection. Otherwise, you can damage the wiring or the device itself.
-
Identify the Connections: The battery is connected by wires and connectors. Notice how the wires attach to the battery terminals. Usually, you’ll see red and black wires, representing positive and negative connections.
Examine the connectors closely. Some connectors have a simple clip. Others use screws. Knowing this helps you disconnect the battery properly.
-
Disconnect the Wires: Disconnect the wires one by one. Use pliers or your fingers, if the connectors have clips. If the wires are screwed on, unscrew them.
Take your time. Gently disconnect the wires. If there are clips, carefully squeeze them. If they are screwed in, loosen them slowly. Avoid pulling the wires forcefully.
-
Remove the Battery: Once all connections are loose, remove the old battery. Take it out carefully. Be aware of the battery’s weight. Dispose of the old battery according to local regulations.
Lifting the battery out might need some maneuvering. Be careful, as it can be heavy. Then, consider how to handle the disposal. Local recycling programs offer safe ways to get rid of old batteries.
Once you disconnect the battery, you can safely remove it from the jump starter. Now, you’re ready to install the new battery.
Installing the New Battery and Closing the Case
The installation of the new battery is a crucial step. It determines if your jump starter works again. Following the steps properly ensures you have a successful jump starter battery replacement. Pay close attention to the wiring and connections.
Connecting the New Battery
The first step after inserting the new battery is connecting the wires. This will require attention to detail. Connecting the wires correctly is important. Incorrect wiring might damage the jump starter.
-
Insert the New Battery: Place the new battery in the jump starter. Make sure it fits correctly. Ensure the terminals face the right way. That is in line with the wires.
The new battery should fit snugly. It should not move around inside the case. If it doesn’t fit, double-check that you have the right size battery.
-
Connect the Wires: Connect the wires to the battery terminals. Match the red wire to the positive terminal (+). Then, match the black wire to the negative terminal (-).
This is where precision counts. Incorrect connections can cause problems. If there are screw terminals, tighten them securely. Otherwise, ensure the clips or connectors are firmly attached.
-
Secure the Connections: Once the wires are connected, double-check that they are secure. Gently tug on each wire to confirm they are properly attached. Loose connections can lead to malfunctions.
Confirming secure connections ensures the jump starter gets power. A slight tug test assures there will be no issues later. This step prevents potential problems.
After you have the new battery connected, you can move on to closing the jump starter case.
Closing the Case and Testing
Closing the jump starter case is the final physical step of the replacement process. Before you fully close it, test to make sure everything works. This is the last opportunity to fix any mistakes. Correctly assembling the case provides protection and security.
-
Align the Case: Carefully put the two halves of the jump starter case back together. Make sure the components inside do not get pinched. Ensure the case closes smoothly.
Careful alignment is essential here. Check that all parts are correctly placed. Prevent any internal wires or components from getting damaged as you close the case.
-
Screw the Case Together: Re-insert the screws into the case holes. Tighten them. Do not overtighten. Otherwise, you can damage the plastic.
Be gentle when screwing the case back together. Overtightening can strip the screws. So, secure them enough. Ensure the case is properly sealed.
-
Test the Jump Starter: Plug in the jump starter to charge it. See if it charges and the lights work. If it doesn’t, check all connections. You may have made a mistake.
Always test the jump starter right after the battery replacement. Charging it and testing the lights confirms the process was successful. This last step gives you the green light.
Once you finish these steps, your jump starter is ready. You will be able to help others or yourself with a dead car battery.
Understanding Battery Types and Specifications
Choosing the correct battery is crucial for a successful jump starter battery replacement. Different types of batteries serve different purposes. Knowing the specifications helps you select the right one. This avoids problems, such as a battery that does not fit or provide the necessary power.
Battery Types for Jump Starters
The correct battery type determines if your jump starter works. It should be both powerful and reliable. The choice depends on the jump starter’s needs.
-
Lead-Acid Batteries: These are a common option. They are cost-effective. They offer good power for jump-starting vehicles. But, they’re heavy and need regular maintenance. They need to stay charged.
Lead-acid batteries deliver a high burst of power. This is ideal for jump starting. They’re less expensive. However, they can leak. You will need to check the acid levels.
-
Lithium-Ion Batteries: These batteries are lighter and more compact. They have a longer life and better performance. They are usually more expensive. However, they have good power density.
Lithium-ion batteries offer several advantages. They are lightweight. They can hold a charge for longer periods. They also charge quicker. But they cost more.
-
Lithium Polymer (LiPo) Batteries: LiPo batteries offer a high power-to-weight ratio. They are often found in newer jump starters. They’re more expensive than other options. You will need to take care when handling them.
LiPo batteries offer the best performance in terms of size and weight. They provide great power. However, they are more susceptible to damage. Handle them with care.
The best choice depends on your needs. Consider the battery’s size, weight, and price. Also, think about the performance. Choose the one that suits your situation.
Reading Battery Specifications
Understanding battery specifications is key. It can seem technical. But understanding these specifications helps you choose the right replacement. Knowing the basics helps you get a battery that fits and works well.
-
Voltage: This is measured in volts (V). It determines the battery’s power. Most jump starters use 12V batteries. Check your old battery to find out.
Voltage is the electrical “pressure”. It should match the original. A higher voltage may damage your device. Also, it might not even fit in the case.
-
Ampere-hours (Ah): This indicates the battery’s capacity. It shows how much current it can supply over time. A higher Ah means the battery lasts longer between charges.
Ampere-hours describe the battery’s capacity. A higher Ah rating means the jump starter can provide more power. It will jump-start more times before you have to recharge.
-
Cold Cranking Amps (CCA): This shows the battery’s ability to start an engine in cold weather. A higher CCA is better for colder climates. This is one of the most important specs.
CCA shows how well the battery works in cold weather. A higher CCA rating is better. It gives a bigger “kick”. It provides more power to start the engine when it is cold.
Always check these specifications. They should match or exceed the old battery. If you’re unsure, seek help from a battery retailer.
Troubleshooting Common Issues
Even with careful preparation, issues can occur during a jump starter battery replacement. Common problems include connection issues and battery malfunctions. Knowing how to handle these issues prevents further damage. It also lets you complete the task.
Battery Not Charging
One of the most frustrating problems is when the new battery does not charge. There can be multiple reasons. Then, the jump starter might not work. Troubleshooting helps you identify the issue.
-
Check the Charger: Ensure the charger is working. Try it with another device. This rules out the charger. If the charger is faulty, you must replace it.
Test the charger is first. You can confirm if the charger is the problem. Or perhaps another part of the jump starter has failed.
-
Inspect the Connections: Check the battery connections. Ensure they’re secure. Loose connections prevent charging. Clean them with a wire brush if there’s corrosion.
Sometimes, connections are not firmly attached. This prevents the flow of electricity. Clean connections help resolve the issue. Reconnecting can often fix it.
-
Test the Battery: Use a multimeter to test the battery. Check its voltage. If it is low or does not increase when plugged in, the battery may be defective.
Using a multimeter helps to pinpoint the source of the problem. If the battery does not charge, then you will have to replace it. A low voltage level indicates a faulty battery.
If the battery doesn’t charge after these checks, consider replacing it. A faulty new battery is rare but can happen.
Jump Starter Not Working
If your jump starter fails to operate after the battery replacement, it’s frustrating. It might be a simple problem, like an incorrect connection. Or, it could be a more complicated issue.
-
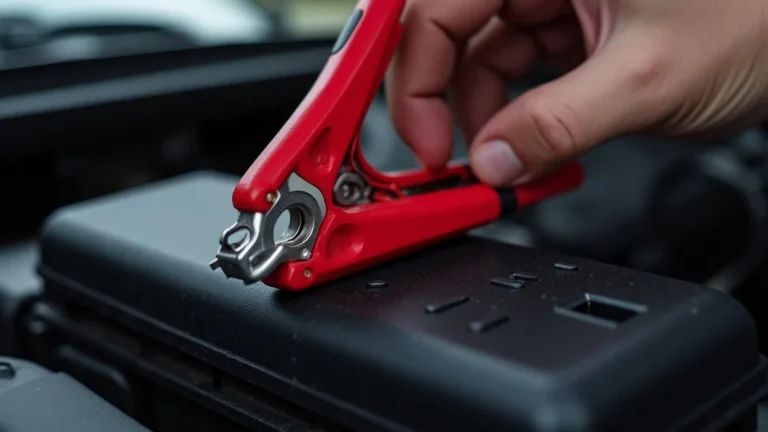
Check the Polarity: Confirm that the battery terminals are connected correctly. The red wire should attach to the positive (+). The black wire should attach to the negative (-). Reversing the connections may damage the jump starter.
Double-check the connections. Incorrect connections are a common mistake. Verify the wires. They should be connected the right way.
-
Inspect Fuses: Many jump starters have fuses. These protect the device. Locate the fuse. Check if it’s blown. Replace the fuse if needed.
Fuses are safety features. A blown fuse might prevent the jump starter from working. A blown fuse often means there is a short. Replace the fuse.
-
Check Internal Wiring: Sometimes, internal wires come loose. Carefully check all the internal wiring. Look for loose or damaged wires. Repair or replace any damaged wires.
Internal wiring problems might cause the jump starter to fail. Be careful while you inspect the wires. If there is damage, then a professional may have to fix it.
If the jump starter still doesn’t work, it may have another problem. You might consider professional service.
Safety Precautions During Battery Replacement
Safety is key during any jump starter battery
Handling Battery Acid and Chemicals
Battery acid is corrosive. Direct contact can cause severe burns. Use care to prevent spills and splashes. If you spill the acid on your skin, you need to neutralize it quickly.
-
Wear Protective Gear: Always wear gloves and safety glasses. These items protect your skin and eyes. They reduce the risk of injury.
Personal Protective Equipment (PPE) is essential when working with batteries. The gear protects you from spills and splashes. If you have the right gear, then you can work safely.
-
Avoid Skin Contact: If battery acid spills on your skin, flush it with water. Use water for at least 15 minutes. Then, seek medical assistance.
Rapid action is necessary if acid gets on your skin. Immediate washing minimizes damage. Washing with water is a basic first aid measure.
-
Proper Disposal: Dispose of old batteries properly. Follow local regulations. Do not throw batteries in the regular trash.
Old batteries are hazardous waste. You must dispose of them responsibly. This helps you to protect the environment. Contact your local recycling center.
Following these safety measures will protect you from hazardous chemicals. This gives you peace of mind.
Working with Electrical Components
Working with electrical components requires safety. Short circuits can happen if you are not careful. You should follow all of these steps for your safety.
-
Disconnect the Power: Before starting, disconnect the jump starter from any power source. This prevents electric shock. Ensure it is unplugged.
Before any work, disconnecting from the power source is crucial. This step is a basic safety measure. This keeps you safe from electric shock.
-
Avoid Sparks: Do not create sparks near the battery. Sparks might ignite any flammable gases. You should avoid sparks at all costs.
Sparks are dangerous around batteries. They can ignite hydrogen gas. So, never create sparks.
-
Insulate Tools: Use tools with insulated handles. This decreases the risk of electric shock. This is another important way to make sure you are safe.
Insulated tools provide extra protection. They limit the chance of electrical accidents. Make sure all your tools are correctly insulated.
Taking precautions with electrical components increases safety. That enables you to do the battery replacement safely.
FAQ: Frequently Asked Questions
Question: How often should I replace the battery in my jump starter?
Answer: It depends on usage. But, generally, you may need a jump starter battery replacement every 2-3 years. If you use it frequently, then you might have to replace it more often. Regularly check your jump starter to see when to replace the battery.
Question: Can I use any battery in my jump starter?
Answer: No. You must use the right battery type and specifications. Match the voltage, CCA, and Ah of the original battery. Refer to your jump starter’s manual. You can ensure the replacement battery will work.
Question: What should I do with the old battery after replacement?
Answer: Recycle the old battery. Do not throw it in the trash. Take it to a local recycling center. They handle them safely. They can help to prevent pollution.
Question: What if my jump starter won’t turn on after the battery replacement?
Answer: Check all connections first. Ensure the battery terminals are connected correctly. Examine the fuse. Make sure it isn’t blown. Then you should also check your charger. Test the charger to make sure it works. If the issue continues, then you may want to consult a professional.
Question: Is it safe to leave my jump starter plugged in all the time?
Answer: It can be risky. Modern jump starters have overcharge protection. But leaving the jump starter plugged in all the time can still damage the battery. It is generally better to charge it. Then unplug it after it is charged.
Final Thoughts
You have now explored the steps for a jump starter battery